
Zirconia puzzle: what makes zirconia unique and how to choose the right zirconia
Zirconia may be part of your everyday vocabulary, but how much do you know about this ceramic material? Learn more…


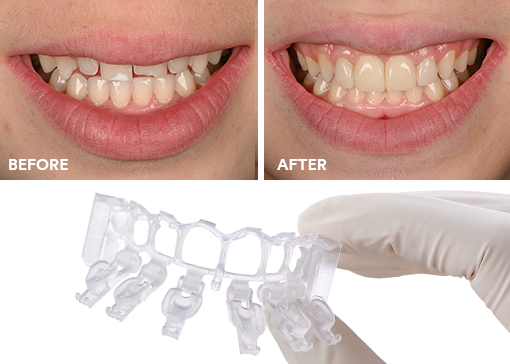
Veneer cementation can be challenging and requires an attention to detail. Use these extra tips to help you master this procedure from try-in to final cure – and produce incredible results with confidence.
The goal of veneers is to achieve the beautiful, long-lasting smile your patients want and deserve. But the final step of the procedure can be challenging. Adhesive cementation is technique-sensitive – and it is crucial to long-term esthetics and durability. Not only are ceramics fragile and thin, it’s also a highly esthetic procedure where any mistake will be visible to the patient.
Ideally, the seating appointment should be the pleasant start of a life-changing esthetic makeover for the patient – and this means cultivating a simple yet efficient cementation protocol. This protocol can be broken down into seven steps:
In this article, we’ll explore each step and provide tips and tricks for efficient, esthetic, long-term results.
First, remove the provisional restorations and any excess cement, and thoroughly clean the area, as anything remaining could interfere with the fit or color (fig 1). A pumice slurry is a good option for the mechanical cleaning of the preparation. The walls and occlusal areas can be cleaned with a small brush, but the sensitive marginal areas close to the gingiva should instead be cleaned with a foam pellet.
Never use sodium bicarbonate-based cleaning agents or powders – they can inhibit bonding. Alternatively, 3M™ Clinpro™ Glycine Prophy Powder can be used. Unlike other prophy powders, it contains glycine, not sodium bicarbonate, making it safe to use.

Figure 1: Cleaned veneer and crown preparations on the central incisors ready for try-in. Images courtesy of Dr. Paulo Monteiro.
Before the veneer can be cemented, it’s important to double-check that everything fits well and meets the esthetic and functional demands of the patient. Just like with clothes, this means trying the veneers on. While it may seem straightforward, there are several factors to consider during the try-in procedure.
Each veneer should be placed on its own, as well as together, to check for fit and proximal contacts (fig 2).

Figure 2: Try-in of a veneer and a crown on the central incisors. Images courtesy of Dr. Paulo Monteiro.
While veneers can be placed dry on top of the prep, this will only confirm fit and won’t necessarily replicate the restoration’s final shade. The final shade of the restoration is the combination of several colors – the prep, the veneer itself, and the resin cement between – all in a wet, fully hydrated environment. That’s why it’s recommended to either add a drop of water between the prep and veneer to allow for more accurate light transmission. Better yet, use a try-in paste.
Try-in pastes offer a few advantages over plain water: not only do they help hold the veneers in place for easier marginal integrity and contact evaluation, but they also allow you to preview and select the correct resin cement shade. For thicker veneers, the color of the resin cement won’t make much of a difference. For thinner veneers (0.3mm to 0.5mm), however, the cement can influence the final esthetics. That’s why it’s important to have several shades on hand. Thankfully, many resin cements, such as 3M™ RelyX™ Veneer Cement and 3M™ RelyX™ Universal Resin Cement, come with matching try-in pastes (fig 3), so that you easily can test shades before cementation. For example, suppose you want a higher value, whiter outcome. In that case, you can perform a test with a white opaque try-in paste with confidence that the corresponding cement will provide those same results. If that doesn’t deliver the right shade, the veneer can be removed, rinsed, and tried with a new shade.

Figure 3: 3M™ RelyX™ Veneer Try-In Pastes in various shades matching 3M™ RelyX™ Veneer and 3M™ RelyX™ Universal Resin Cement. Image courtesy of Dr. Paulo Monteiro.
Rinse, dry and isolate the teeth with a rubber dam (fig. 4), and if necessary, retraction cord or retraction paste. Isolation is essential during cementation as it improves access, visibility, and helps maintain a clean, dry field to work on.

Figure 4: Preparations isolated with rubber dam. Image courtesy of Dr. Paulo Monteiro.
Do a final try-in with the rubber dam in place (fig. 5) to see if the insertion path and the veneer margins interfere in any way with the cord, the rubber or the clamps. If necessary, re-adjust the isolation to be sure everything will work for the final seating.

Figure 5: Final try-in with isolation in place. Image courtesy of Dr. Paulo Monteiro.
To select the correct pre-treatment and cement, it is essential to know what material your lab technician uses and if any pre-treatment has already been performed by the lab. This will both guide you toward the best possible bond and help you avoid any undertreatment or unnecessary overtreatment. Using a form, such as the 3M Success Simplified Cementation Guide, can help optimize communication with the lab and ensure you have all the information you need for cementation.
Different materials require different pre-treatments, and it’s important to know which is best for the case at hand. Glass ceramics like lithium disilicate or feldspathic glass ceramics veneers should be etched with hydrofluoric acid to create micro-retentions in the material (fig 6). On the other hand, oxide ceramics that don’t have etchable glass particles, like zirconia, or resin-based materials, should be sandblasted with alumina and subsequently cleaned with alcohol.

Figure 6: Etching pre-treatment of a glass ceramic veneer with hydrofluoric acid. Image courtesy of Dr. Paulo Monteiro.
Glass ceramic veneers need to be carefully cleaned after etching to remove silica-fluoride salts precipitated on the etched surface. This can be done by rinsing with a water spray until all the white debris is removed (fig 7).

Figure 7: Cleaning of a glass ceramic veneer after etching with a strong water spray. Image courtesy of Dr. Paulo Monteiro.
But what if the lab has already completed etching or sandblasting before delivering the restorations to you? In this case, a more intense cleaning protocol is required to remove any contamination that might have occurred during try-in. For glass-ceramic restorations, this can be achieved by rubbing with phosphoric acid for one minute before rinsing with water. In contrast, phosphoric acid should not be used on zirconia, as it does impair the bond. Here sodium hypochlorite (NaOCl) or dedicated cleaning agents can be used to remove try-in contaminations from pre-sandblasted bonding surfaces.
Once washed, the glass-ceramic veneer should be dried before applying a silane.1 Many silane options are available, from stand-alone silane primers to universal primers with a silane component to all-in-one universal adhesives containing silane, such as 3M™ Scotchbond™ Universal Plus Adhesive. The latter has a proven silane formulation that enables bond strength to glass ceramics on the level of classic separate silane primers.2 In addition to the silane component, Scotchbond Universal Plus Adhesive also contains MDP for priming zirconia veneers.

Figure 8: Application of 3M™ Scotchbond™ Universal Plus Adhesive as the silane primer on the etched glass ceramic veneer bonding surface. Image courtesy of Dr. Paulo Monteiro.
After rubbing in Scotchbond Universal Plus Adhesive for 20 seconds (fig 8) air dry for 5 sec until all solvent is removed and then protect the coated surface from light until applying the cement for seating.
First, any areas without enamel, such as a composite build-ups or dentin should be sandblasted with aluminum oxide and rinsed (fig 9).

Figure 9: Pre-treatment of the composite build-up by sandblasting with 30 µm aluminum oxide. Image courtesy of Dr. Paulo Monteiro.
Next, any enamel present should be etched with phosphoric acid, such as 3M™ Scotchbond™ Etchant, for 15 seconds, thoroughly rinsed for at least 15 seconds, and dried (fig. 10).

Figure 10: Etching of the preparations with phosphoric acid. Image courtesy of Dr. Paulo Monteiro.
Now it is time to apply the bonding system recommended for the cement in use, e.g., Scotchbond Universal Plus Adhesive for RelyX Veneer Cement or RelyX Universal Resin Cement.

Figure 11: Application of 3M™ Scotchbond™ Universal Plus Adhesive. Images courtesy of Dr. Paulo Monteiro.
After protecting the neighboring teeth with PTFE tape, Scotchbond Universal Plus Adhesive is rubbed in for 20 seconds and then air dried until all solvent is completely removed and the adhesive no longer moves (fig 11, 12). Correctly applied adhesive will form a glossy film throughout the entire bonding surface. Do not light cure the adhesive to avoid accidentally ending up with a thicker layer than intended.

Figure 12: Air drying of 3M™ Scotchbond™ Universal Plus Adhesive. Images courtesy of Dr. Paulo Monteiro.
An esthetic adhesive resin cement with a separate bonding system is the cement of choice for long-term esthetic restorations like veneers, both because of their non-retentive preparation design and the fact that they are mostly on enamel. This type of adhesive resin cement provides excellent bond strength and is also color stable. There are two main cement options to choose from: a light-cure resin cement or a dual-cure resin cement.
Light-cure resin cements, such as RelyX Veneer Cement, are the gold standard for veneers as they allow unlimited working time. Veneer placement can be challenging and being able to take your time to get it right is particularly beneficial. It’s important to keep in mind that light-cure resin cements must be cured completely to take advantage of these properties, which can be challenging in the case of thicker veneers. Alternatively, you can use a dual-cure resin cement, such as RelyX Universal Resin Cement, which delivers strong bonds and high esthetics but comes with a time limit. If you don’t perform many veneer procedures and don’t need a designated veneer cement around the office, dual-cure resin cements provide a great alternative as they have many other applications.
With this in mind, and with the teeth and veneer prepared, you can apply your chosen resin cement to the inside of the veneer. But how much should you apply? In truth, it’s not about quantity but rather uniformity. Just make sure there’s enough to cover the entire surface of the ceramic evenly (fig 13). There will always be excess, but excess can be removed – air bubbles or space between the veneer and prep cannot.

Figure 13: Application of 3M™ RelyX™ Universal Resin Cement. Images courtesy of Dr. Paulo Monteiro.
Now is the moment of truth: veneer seating. Every dental professional has their own approach, placing one at a time or all at once. When I have multiple veneers to place, I always start with the two center incisors, then the two laterals, followed by the canines, and so on. If there’s anywhere you cannot make a mistake, it’s the center incisors; they’re the most visible, so they are the best place to start. Personally, I seat the veneer on the tooth and start to remove the excess with a sponge. I then use an instrument to fix the veneer in position with gentle pressure and remove the excess that flows into the margins with floss. Once all the veneers are placed, and the main excess is removed, they need to be stabilized – and that means it’s time to light cure.
As with many restorative procedures, the final light cure is vital to veneers’ longevity, functionality, and esthetics – and can be the difference between success and unhappy patients. An improper cure can lead to discoloration on the margins or even debonding. To achieve a thorough cure, it’s important to know the requirements of your materials, use proper technique, and ensure that your curing light is up to par. Every dental professional should have a reliable, high-quality curing light, such as 3M™ Elipar™ DeepCure-S LED Curing Light and should test it regularly to ensure that it delivers the proper output.
I apply a glycerin gel to the margins to eliminate the oxygen inhibition layer and ensure a complete cure before light curing through the gel for 20 seconds on the palatal and buccal side (fig 14). In the case of veneers, light curing comes down to the thickness of the material. A thicker, more opaque veneer may require a longer cure time.

Figure 14: Light curing. Images courtesy of Dr. Paulo Monteiro.
After light curing has secured the veneers in place it is time to remove any remaining excess cement with a blade (fig 15) before finishing the margins with rubber polishers and discs.

Figure 15: Final excess clean-up with a blade. Image courtesy of Prof Paulo Monteiro.
Every step of the veneer procedure is fundamental to the outcome, but cementation is the culmination of all those efforts. And it can be challenging. In my experience, the recipe for success is to follow the recommendations above, get to know your materials, develop a streamlined protocol, and use proven products. Together, these steps can lead you to excellent results – and satisfied patients (fig 16).

Figure 16: 2-month follow-up image of the final result. Image courtesy of Prof Paulo Monteiro.


Zirconia may be part of your everyday vocabulary, but how much do you know about this ceramic material? Learn more…
Achieving the correct shape is vital to a natural-looking anterior composite restoration. Learn how the 3M™ Filtek™ Matrix, paired with…
Direct composite restorative procedures can be challenging, particularly when it comes to esthetic cases. Discover how new techniques and tools…