


INTRODUCTION
In today’s society, we are seeing more and more patients presenting with teeth that are severely broken down either from decay, wear, or periodontal disease. Our goal as dental providers is to treat the various dental problems these patients present with to maintain an oral environment that is healthy, functional, and aesthetic. However, there comes a time when all the various dental treatments are exhausted, and tooth removal is necessary.
This article describes a patient who was referred to me by a colleague for full-mouth dental implant reconstruction because all her previous treatments were no longer maintaining a healthy periodontium.
CASE REPORT
Initial Consultation
A patient in her mid-60s presented to my practice and was referred to me by her general dentist for an evaluation of her existing dental condition in both her maxillary and mandibular arches (Figure 1). The patient informed me that there were several areas where the teeth felt loose and uncomfortable. In fact, a portion of her upper left, fixed, partial denture had been recemented several times to try to buy the patient some time before deciding on what treatment she would pursue. Her main concern was restoring her dentition to proper form, function, and aesthetics, even if it meant extracting all her existing teeth.
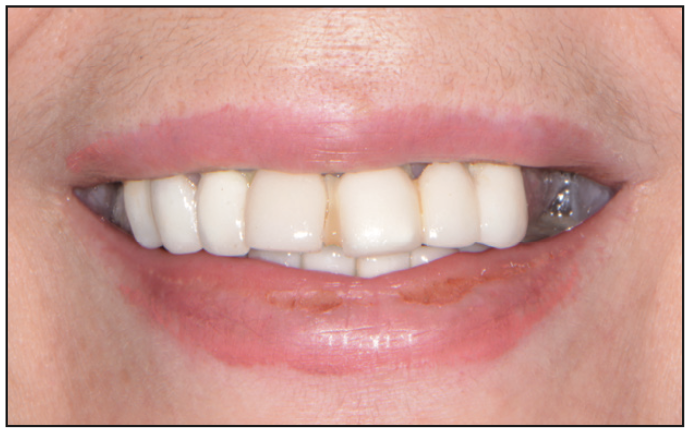
Figure 1. Preoperative smile view.
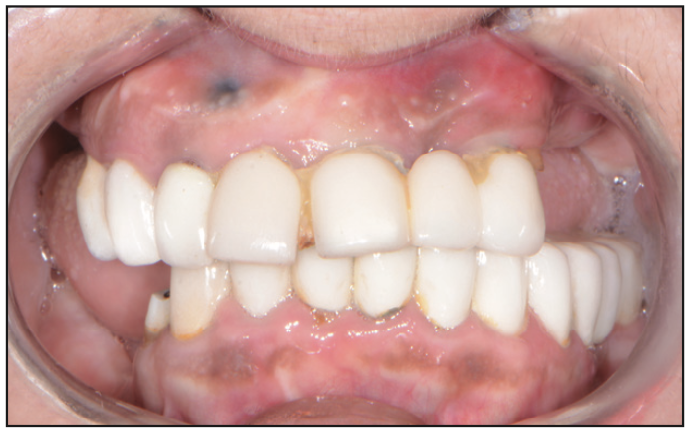
Figure 2. Pre-op retracted bite view.
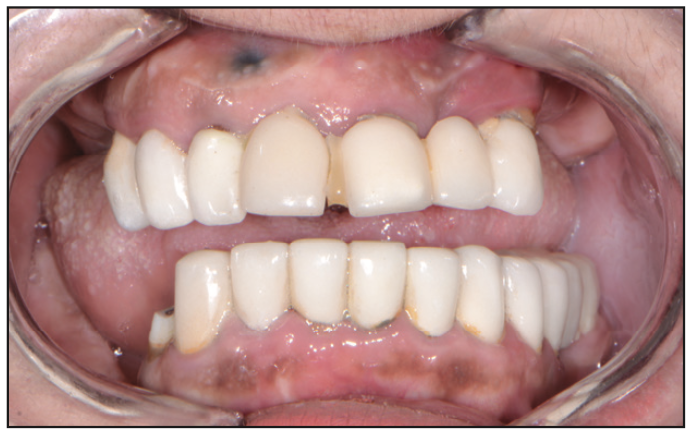
Figure 3. Pre-op retracted open bite view.
Upon clinical examination, it was very apparent that, in the past, the patient had already undergone extensive restorative and prosthetic rehabilitation by trying to save her teeth with multiple areas of crowns and bridges (Figures 2 and 3). Due to the recent loss of her posterior maxillary and mandibular teeth within the last few years, the patient’s vertical dimension was showing signs of collapse, causing further force and wear on her anterior teeth and restorations. Deep periodontal probing depths in many areas indicated localized periodontitis in most of her remaining teeth. It was also noted that there were several areas in the gingival tissue where there appeared to be “amalgam tattoos,” which were signs that some of these teeth were possibly treated with apicoectomies. When asked, the patient did mention that several of these teeth had been treated on multiple occasions with endodontic therapy, followed by apical surgery, to try to maintain these teeth as long as possible. Reviewing her radiographs (XDR Radiology) as well as her CBCT scans (CS 8100 [Carestream Dental]), it was very apparent that several teeth in the maxillary arch were treated with endodontic treatment followed by apical surgery (Figure 4). Additionally, there were several areas of recurrent decay at the margins of the dental restorations. Bone loss was also very evident in the radiographs and CBCT images.
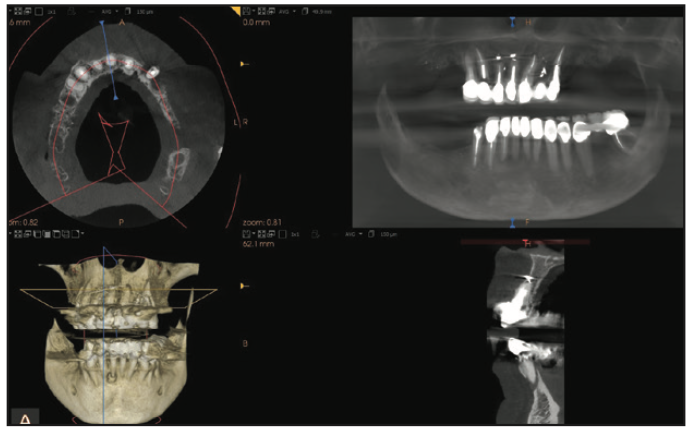
Figure 4. CS 8100 (Carestream Dental) 3D view.
All risks, benefits, and alternatives of various treatments were reviewed with the patient. It was decided that the treatment that would provide the best prosthetic, functional, and aesthetic outcome for the patient with a good long-term prognosis would be to remove all the remaining teeth and replace them with fixed, full-arch, implant-retained restorations.
Planning
Once the patient confirmed that she would like all her remaining teeth extracted, our goal was to plan the placement of dental implants in regions of bone so that the final fixed restorations would be biomechanically stable. Using the CS 8100 planning software, we virtually positioned the placement of dental implants according to an adaptation of Misch’s principles in full-mouth dental implant reconstructions (Figure 5). Misch developed a treatment plan sequence to decrease the risk of biomechanical overload to a fixed implant prosthesis consisting of (1) prosthesis design, (2) key implant positions for the prosthesis, (3) patient force factors, (4) bone density in the edentulous sites, (5) implant number beyond key positions, (6) implant size, (7) available bone in the edentulous sites, and (8) implant design.1 Since the patient’s bone was somewhat compromised in the areas of the apicoectomies, it was decided to place additional dental implants in those regions to ensure a more successful outcome. When selecting dental implants for immediate loading of a full-arch, fixed provisional restoration, one should choose an implant with a slightly tapered design, aggressive threads, and a prosthetic platform design that preserves crestal bone. The dental implant of choice for this reconstruction was Touareg OS dental implants (Adin Dental Implants) because of its self-tapping and bone-condensing design that achieves high primary stability. Additionally, these dental implants feature a calcium phosphate gritting media surface treatment, OsseoFix (Adin Dental Implants), to achieve the desired roughness for optimum osseointegration.
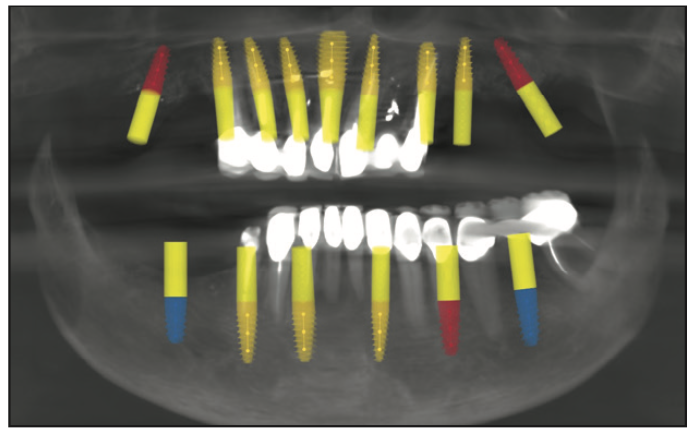
Figure 5. Treatment planning of dental implants.
When planning for the placement of dental implants for full-mouth reconstruction, several anatomic factors need to be evaluated by the solo dental/surgical provider or dental team (specialist and restorative dentist). These include, but are not limited to2-4:
1. The magnitude of the 3D anatomical defect
2. The visibility of the prosthetic transition line
3. The volume and quality of available bone in the maxillary zones
4. The position of the inferior alveolar nerve and mental foramen
Utilizing these principles, a virtual treatment plan was forwarded to Pittman Dental Laboratory (Gainesville, GA) and ITX Pros (Tampa, Fla) to further complete the planning and ultimately design surgical guides. In the lab, the patient’s digital data, including images of her dentition and smile, along with impressions of the teeth (Silginat [Kettenbach LP]), were merged with the underlying 3D bone structures taken from the CBCT scan (Carestream Dental). Once the data was fused, it served as the foundation for a virtual online meeting that included the dental provider, the doctor on staff at ITX Pros, and the lab technician (Pittman Dental Laboratory). The virtual workup was based on all the assembled digital and clinical information from the respective dental provider and laboratory personnel. The treatment plan that was formulated among all the team members included optimal implant position, size, depth, and orientation. Using eDentalCAD software (exocad), the dental laboratory also designed the implant-supported, immediate, fixed, maxillary and mandibular PMMA prostheses.
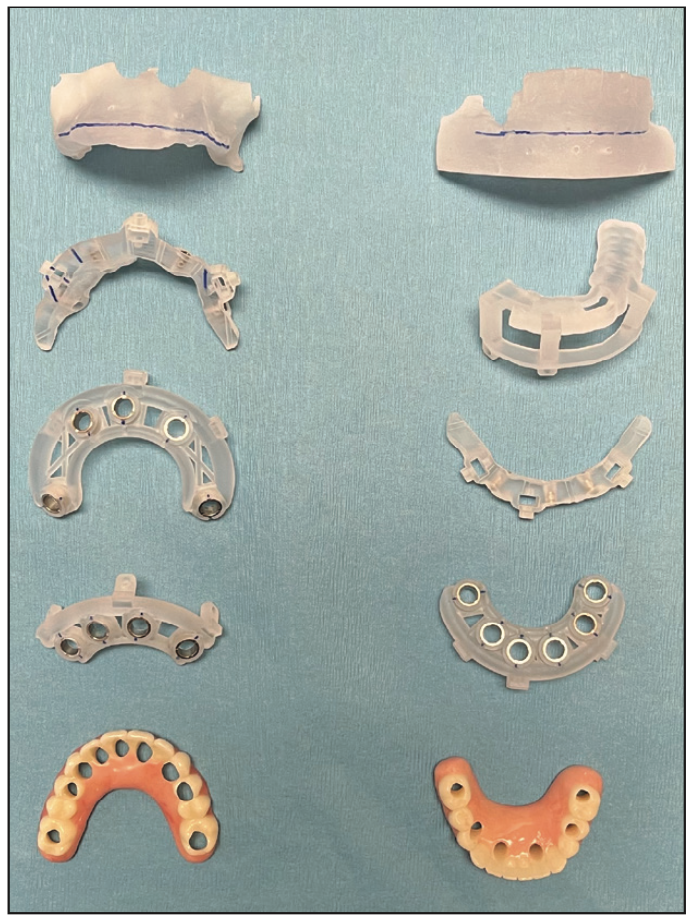
Figure 6. Surgical guides and provisional restorations.
Once the planning was completed amongst the collaborative teams, all the components for the surgery were fabricated and delivered to the dental office.5,6 These components included the bone foundation guides, surgical implant guides, and PMMA immediate provisional restorations (Figure 6). Necessary bone retention pins with respective drills were also provided in the package for proper anchorage. Before use, these components would be sterilized using cold sterilization.
Surgery
On the day of surgery, the patient was appropriately sedated with IV medications, and local anesthesia was administered in both the maxillary and mandibular regions. Since the patient’s maxillary teeth exhibited Class III mobility, the bone foundation guide would be positioned on the patient’s anterior nasal spine for greater stability after removal of her maxillary teeth (Figure 7) with the GoldenForce Forceps (GoldenDent). A full-thickness flap was reflected (Figure 8) using the Reflector (GoldenDent) on the facial aspects of the ridge, and the bone foundation guide was secured with bone screws. Bone leveling was accomplished using a surgical motor (AEU-7000 [Aseptico]) and handpiece (Mont Blanc [Anthogyr]) with copious amounts of sterile saline irrigation (Figure 9).
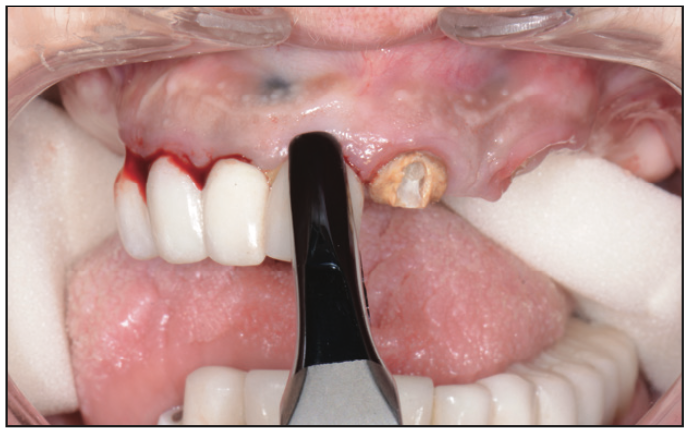
Figure 7. Extractions using GoldenForce Forceps (GoldenDent).
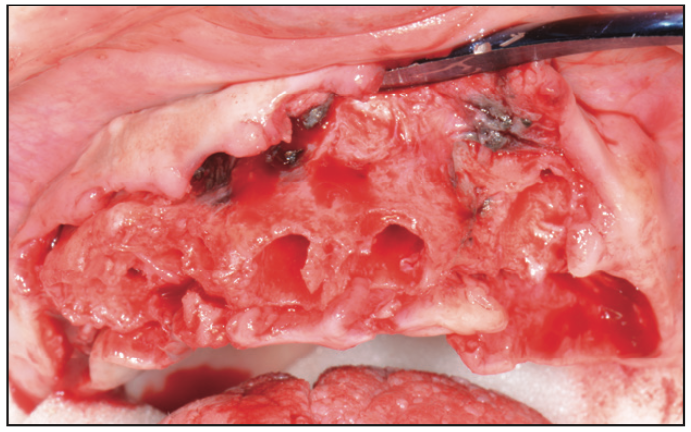
Figure 8. Reflecting tissue with a Reflector instrument (GoldenDent).
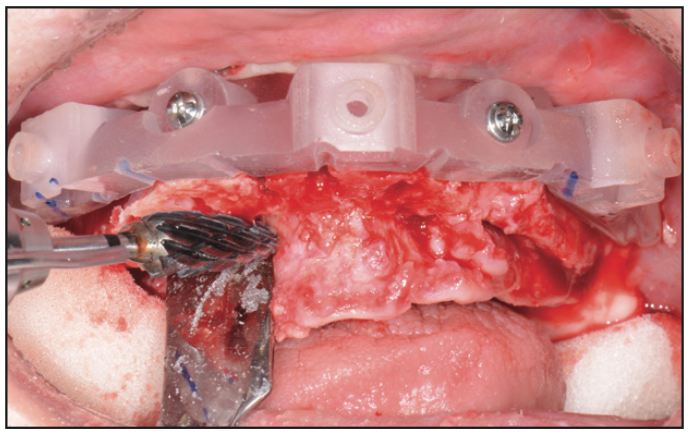
Figure 9. Bone leveling with a surgical handpiece.
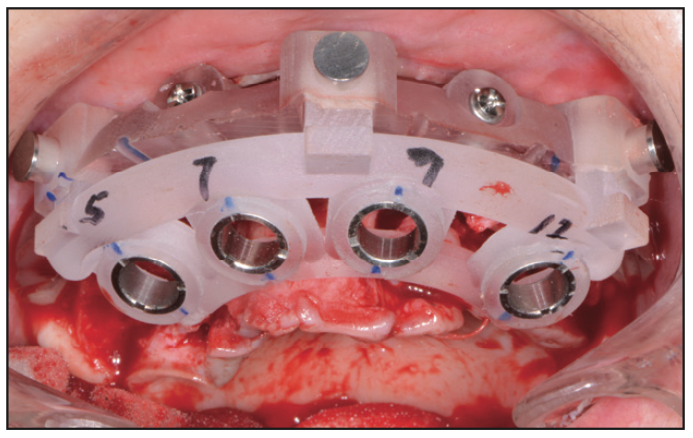
Figure 10. A surgical implant guide (Pittman Dental Lab/ITX Pros).
Once the bone was relieved to the level of the guide, the implant surgical guide was positioned and secured into the bone foundation guide (Figure 10). Following the instructions from the dental lab and planning company (Pittman Dental Laboratory, ITX Pros), a drilling protocol was utilized with Adinguide (Adin Dental Implants), a CBCT guided drilling and implant insertion kit (Figure 11). Some of the advantages that I have personally found with this system is the keyless, self-centering drills that have built-in stoppers to ensure precise and accurate drilling to the desired depth. Most importantly, the Adinguide’s ActiveFlow irrigation technology design forces coolant through the guide to ensure that the irrigation reaches the bone, preventing overheating. Once the sequential drilling was completed, the dental implants (Touareg OS) were inserted with fixed implant drivers through the sleeves of the surgical guide (Figure 12). The dental operator may use either a hand-operated ratchet or a handpiece adapter to insert the dental implant at a recommended torque of 50 Ncm.

Figure 11. Adinguide (Adin Dental Implants).
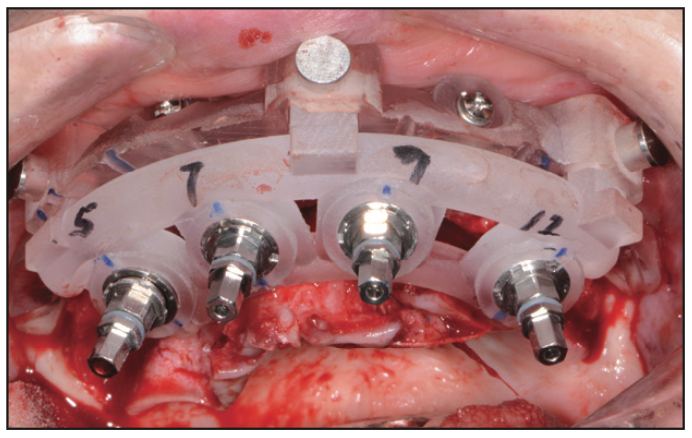
Figure 12. Implant insertion drivers.
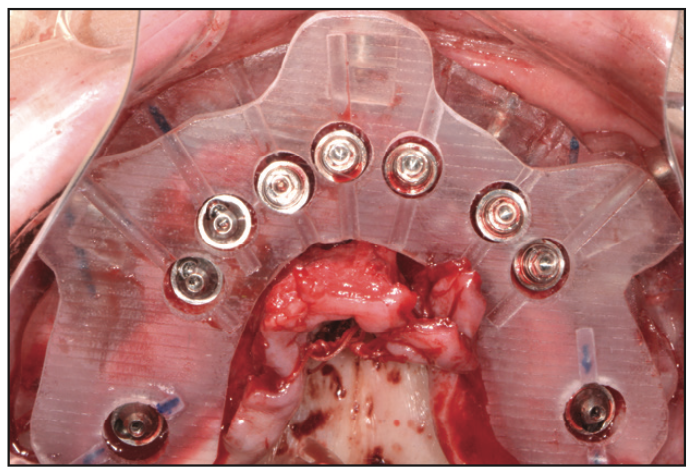
Figure 13. Occlusal view of transmucosal abutments.
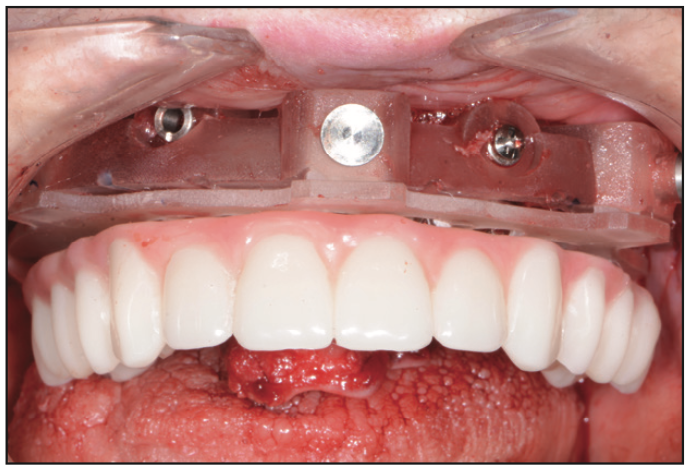
Figure 14. Maxillary PMMA provisional restoration.
To ensure the correct orientation of the internal hex component, an occlusal view of the placed implants was inspected (Figure 13), followed by the placement of the transmucosal abutments (Adin Dental Implants). These multi-unit abutments were torqued to a level of 25 to 30 Ncm. The PMMA provisional restoration (Pittman Dental Laboratory) was then positioned over the prosthetic guide that was secured into the bone foundation guide (Figure 14). Using Quick Up (VOCO), a gingiva-colored composite for luting attachments, the temporary cylinders were picked up. The ideal combination of self-curing and light curing ensured full setting before the provisional was unscrewed from the multi-unit abutments. Any excess acrylic was removed with an acrylic bur (Komet) and polished to high gloss. It is important to note that it is desired to have a convex undersurface of the FP3 provisional restoration for proper tissue healing and cleansabilty.
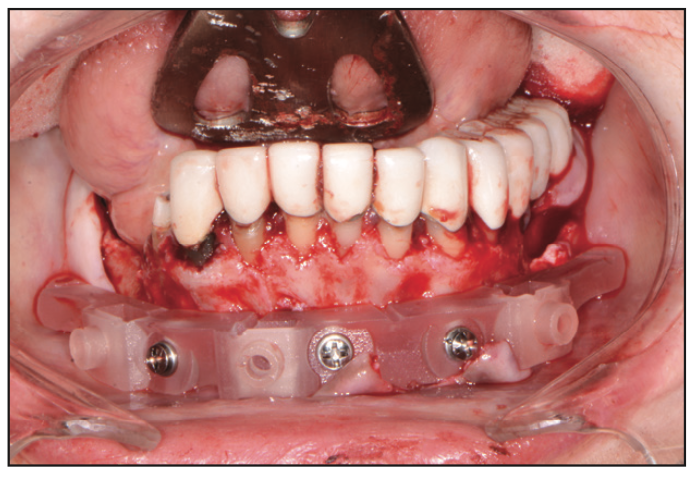
Figure 15. Mandibular bone foundation guide.
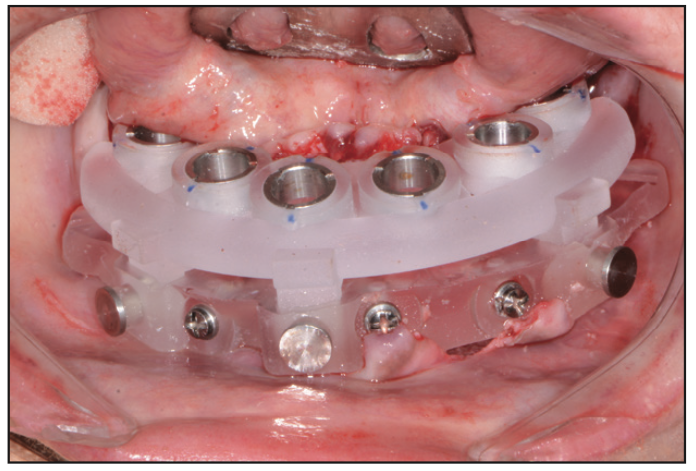
Figure 16. Surgical implant guide.
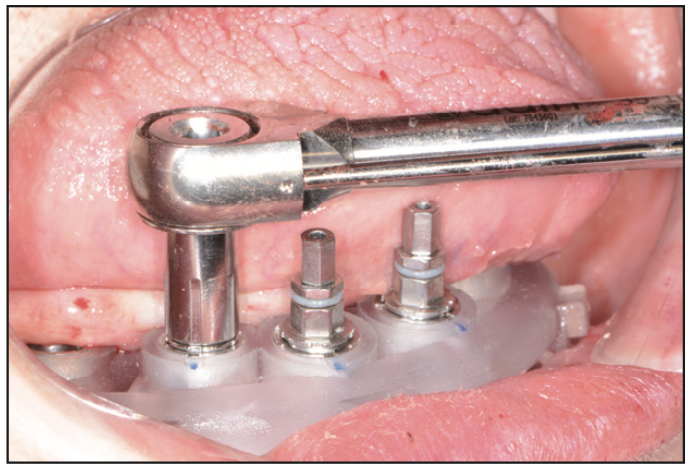
Figure 17. Insertion of Touareg OS dental implants (Adin Dental Implants).
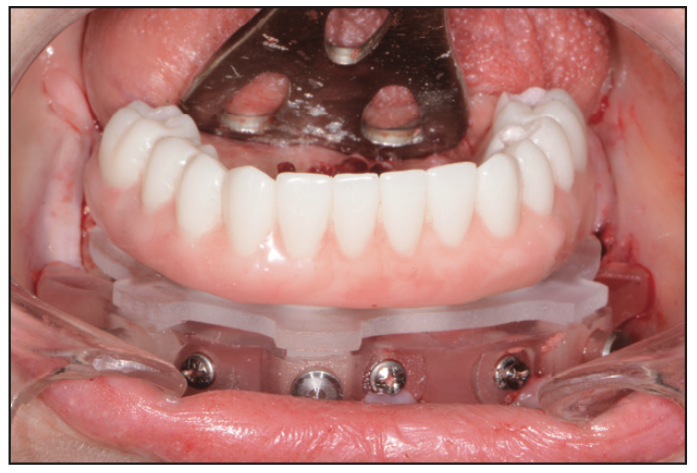
Figure 18. Mandibular PMMA provisional restoration.
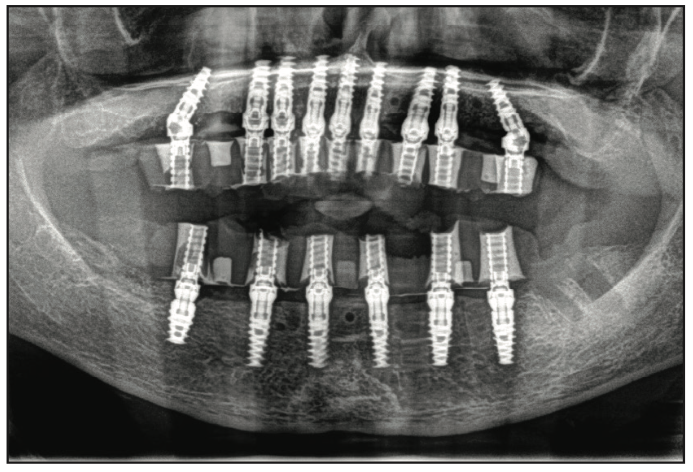
Figure 19. Panorex view of immediate provisionals on dental implants.
In the lower arch, a full-thickness flap was reflected; however, a tooth positioning guide was used to position the bone foundation guide into its accurate position. Using bone screws, the bone foundation guide was then stabilized (Figure 15). At this point, the tooth positioning guide was removed to get full access to the remaining mandibular teeth. Using the Wedge (GoldenDent) instrument, the teeth were loosened, followed by their removal via the Physics Forceps (Directa Dental). Once the teeth were removed, an appropriate alveolectomy was performed, followed by the indexed placement of the surgical implant guide (Figure 16). Again, a fully guided protocol with an appropriate drilling sequence (Adinguide) was used to allow the placement of 6 Touareg OS dental implants. All implants were placed within insertion torque values that ranged from 50 to 70 Ncm (Figure 17). Straight transmucosal abutments were then positioned and tightened to about 25 to 30 Ncm, followed by the placement of the temporary cylinders. Once again, the prosthetic pickup of the provisional restoration was accomplished using Quick Up material (Figure 18). The prosthesis was then removed, contoured, and polished. Soft-tissue closure was accomplished with 4.0 Chromic Gut Sutures (GoldenDent). Once the provisional bridge was secured back onto the multi-unit abutments, any bite adjustments were made with a red diamond football bur (Komet).7,8 After the patient recovered from anesthesia, an immediate postoperative panoramic x-ray was taken, confirming the position of the dental implants (Figure 19).
Prosthetics
The final restorative phase of treatment was initiated after about 4 to 5 months of healing to ensure full osseointegration of the dental implants. Full-arch impressions were taken using Panasil (Kettenbach LP) polyvinyl siloxane material. Relations were accomplished by taking a bite registration (Futar [Kettenbach LP]) using clear duplicates of the provisional restorations. These impressions and relations, along with digital images of the patient smiling, were forwarded to the dental laboratory (Hybrid Technologies, Orlando) for design in DentalCAD software. Verification jigs (Figure 20) as well as a smile composer were fabricated by this dental laboratory for both the upper and lower arches. When the patient returned several weeks later, the verification jigs were tried in, followed by the smile composers. When the verification jig was inserted, its components were secured with light-cure composite (Grandio Flow [VOCO]) followed by an open-tray impression using Panasil heavy- and light-body material. The smile composers were then inserted so that the patient could see how they looked. Another bite registration was accomplished using Futar Bite Registration with the smile composers (Figure 21). Since the patient was very pleased with the aesthetics of these smile composers, we instructed the dental laboratory to fabricate the definitive restorations.

Figure 20. Duralay verification jigs.
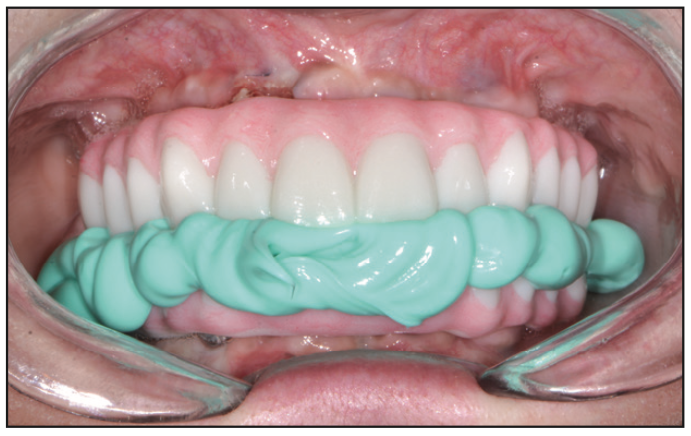
Figure 21. Futar Bite Registration (Kettenbach LP) with the smile composers.

Figure 22. Zirconia on titanium frame hybrid restorations (Hybrid Technologies).
When providing full-arch, fixed FP3 dental implant restorations, I prefer to utilize a titanium frame with overlying monolithic zirconia and pink porcelain (Figure 22) to replicate the gum tissue. I have personally found that this type of hybrid restoration prevents fractures, chipping, and staining of the teeth because of its zirconia component. In contrast, the titanium component prevents coping dislodgement and distal fracture of cantilevers.9,10 It is highly suggested that these patients have a nightguard to help with any nighttime grinding or clenching.
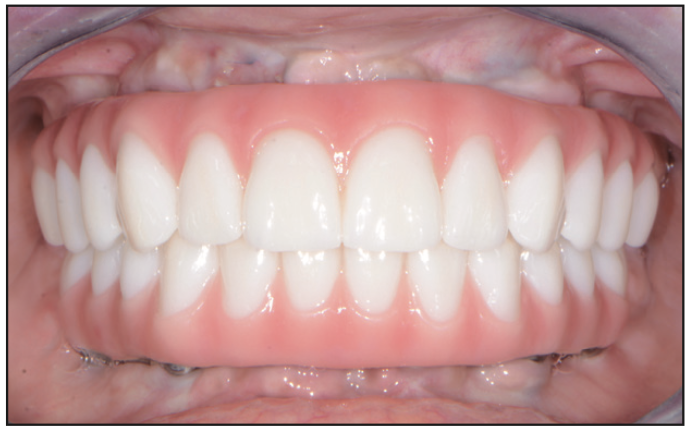
Figure 23. Postoperative retracted bite view.
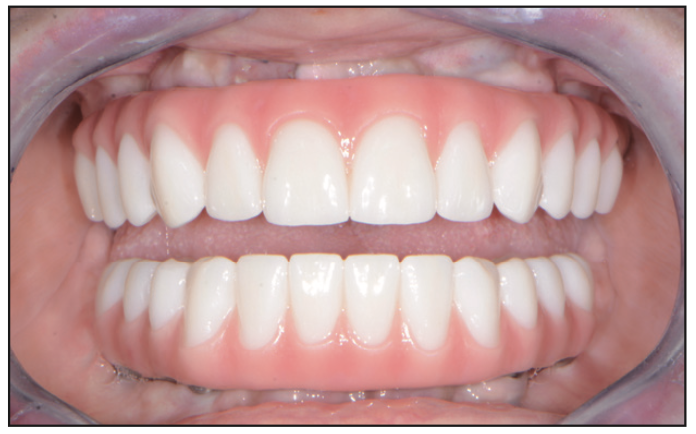
Figure 24. Post-op retracted open bite view.
The definitive titanium hybrid fixed restorations (Hybrid Technologies) were inserted and torqued to the manufacturer’s recommendation of 15 Ncm (Figures 23 and 24). A panoramic x-ray was taken to confirm full seating (Figure 25). Once confirmed, FirstPlug (35 Newtons), a patented medical-grade PTFE material, was placed into the screw channel of the implant restorations, followed by composite material (Wagofil [GoldenDent]).
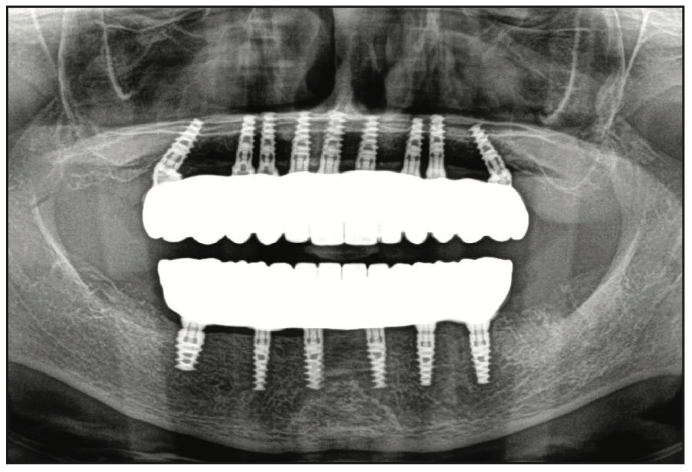
Figure 25. Post-op panorex x-ray.
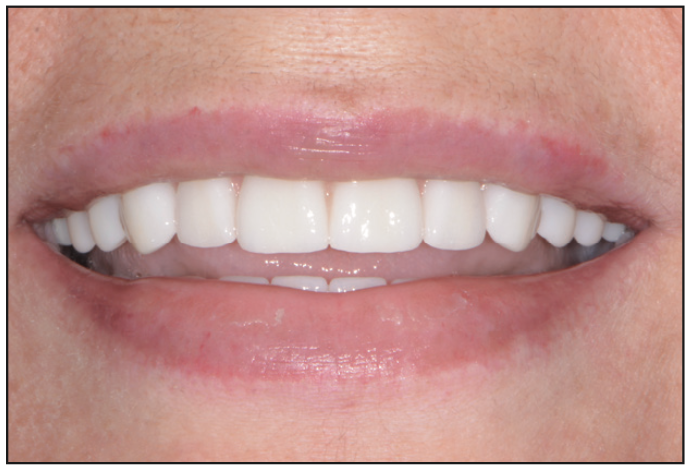
Figure 26. Post-op smile view.
The patient, as well as the referring dentist, was very pleased with the final result (Figure 26). Not only were we able to provide an ideal aesthetic outcome, we were also able to provide one that would have a more favorable functional outcome with a good, long-term prognosis. As dentists, our goal is always to save teeth. However, there comes a time or situation where a tooth or teeth is not restorable or does not have a great prognosis, so a dental implant or full-mouth reconstruction with several dental implants is recommended.
REFERENCES
1. Misch CE. The implant quality scale: a clinical assessment of the health-disease continuum. Oral Health. 1998;88(7):15-20, 23-5; quiz 25-6.
2. Jivraj S, Chee W, Corrado P. Treatment planning of the edentulous maxilla. Br Dent J. 2006;201(5):261-79; quiz 304. doi:10.1038/sj.bdj.4813952
3. Davarpanah M, Szmukler-Moncler S. Immediate loading of dental implants: Theory and clinical practice. Quintessence International; 2008.
4. Bedrossian E. Implant treatment planning for the edentulous patient. Mosby; 2008.
5. Romanos GE, Gupta B, Gaertner K, et al. Distal cantilever in full-arch prostheses and immediate loading: a retrospective clinical study. Int J Oral Maxillofac Implants. 2014;29(2):427–31. doi:10.11607/jomi.3243
6. Vercruyssen M, Laleman I, Jacobs R, et al. Computer-supported implant planning and guided surgery: a narrative review. Clin Oral Implants Res. 2015;26 Suppl 11:69-76. doi:10.1111/clr.12638
7. Drago C. Frequency and type of prosthetic complications associated with interim, immediately loaded full-arch prostheses: a 2-year retrospective chart review. J Prosthodont. 2016;25(6):433–9. doi:10.1111/jopr.12343
8. Balshi SF, Allen FD, Wolfinger GJ, et al. A resonance frequency analysis assessment of maxillary and mandibular immediately loaded implants. Int J Oral Maxillofac Implants. 2005;20(4):584–94.
9. Pozzi A, Tallarico M, Moy PK. Four-implant overdenture fully supported by a CAD-CAM titanium bar: A single-cohort prospective 1-year preliminary study. J Prosthet Dent. 2016;116(4):516–23. doi:10.1016/j.prosdent.2016.03.015
10. Kapos T, Evans C. CAD/CAM technology for implant abutments, crowns, and superstructures. Int J Oral Maxillofac Implants. 2014;29 Suppl:117–36. doi:10.11607/jomi.2014suppl.g2.3
ABOUT THE AUTHOR
Dr. Nazarian graduated from the University of Detroit Mercy School of Dentistry and completed an AEGD residency from the US Navy in San Diego. In addition, he completed advanced training in dental implants and grafting from the world-renowned Misch International Implant Institute and holds a Diplomate in the International Congress of Oral Implantologists. He teaches other dentists the art and science of dental implants and cosmetics so that his methods can help others outside of his own practice. He has taught non-invasive extractions, grafting, full-mouth rehabilitation, and 3D diagnosis and treatment planning with CBCT. He has been published nationally and internationally in leading dental publications in the areas of cosmetics, metal-free crowns, extractions, grafting, sinus lifts, immediate implant placements, same-day implant provisionalizations, and CAD/CAM restorations. He can be reached at aranazariandds@gmail.com.
Disclosure: Dr. Nazarian reports no disclosures.


