
Contouring and Polishing Anterior Composite Restorations created with the 3M™ Filtek™ Matrix
Achieving the correct shape is vital to a natural-looking anterior composite restoration. Learn how the 3M™ Filtek™ Matrix, paired with…

Where do you start with minimally invasive selective caries removal – and, more importantly, where do you stop? Learn how minimally invasive interventions can help you preserve natural tooth structure, and how modern adhesive materials can help by bonding and sealing caries-affected dentine.
“Drill and fill”: many clinicians learned this surgical, mechanical approach to dentistry as the first and only approach to operative caries management. But this traditional “surgical” method does nothing to address a patient’s overall vulnerability to caries and does nothing to prevent the next cavity. A more contemporary approach to operative dentistry takes a more holistic view – by treating the patient, not just the tooth, using minimum intervention oral healthcare.
Minimum intervention oral healthcare (MIOC) is a holistic, patient-focused, team-delivery framework underpinning a preventive approach to caries management. This framework involves four interlinked domains of care:
Watch the discussion of patient-focused minimum intervention oral care (MIOC), minimally invasive dentistry (MID), its operative principles, and more below.
Minimally invasive dentistry (MID) isn’t just an intervention – it’s also a form of tertiary prevention. The underlying goal is to conserve and preserve as much viable tooth structure as possible while maintaining the integrity and viability of the tooth. In cases where patients present with cavitated, active and physically uncleansable carious lesions – where primary prevention-only strategies are no longer sufficient – a minimally invasive operative intervention may be appropriate. Modern preparation techniques and the latest innovations in restorative adhesive materials make selective caries removal not only desirable, but also more easily and reliably achievable.
Minimally invasive intervention in a deep carious lesion close to the pulp advocates that some caries-affected dentine may be retained adjacent to the pulp to avoid any unnecessary vital pulp exposure. For that reason, a minimally invasive operative intervention should be considered for all patients who should be compliant with primary preventive protocols, since control of the plaque biofilm at the tooth surface is essential to preventing further caries activity. In fact, this principle should apply to all restorations placed!
The extent of tissue removal is determined by three main factors:
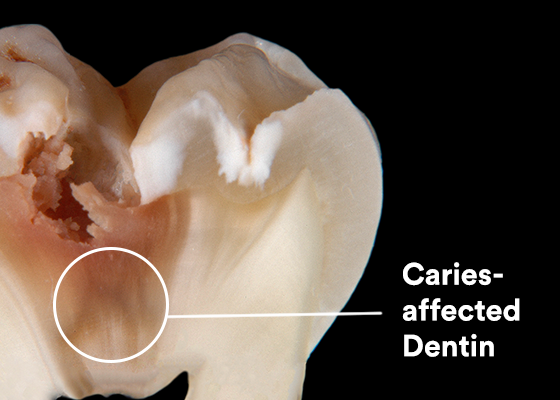
Caries-infected dentine
Caries-affected dentine
Sound dentine

Histological zones of a deep occlusal carious lesion. Image courtesy of Prof. Leandro Hilgert and Prof. Soraya Leal, University of Brasilia (UnB), Brazil
Note that these lesion zones do not have distinct, clearly identifiable boundaries, but rather a gradient of bacterial and structural change. It isn’t always easy to assess the boundary between highly bacterially contaminated caries-Infected dentine and predominantly demineralized caries-affected dentine. Research has shown that caries-detector dyes can permeate into caries-affected and even sound dentine zones, which can encourage unnecessary tissue removal. A visual and tactile assessment can help distinguish among the zones. Caries-affected dentine may be discolored but should feel leathery/firm, offering some resistance to a spoon hand excavator – unlike the darker brown and easily deformed superficial caries-infected dentine, which feels soft, sticky and wet.
If the radiograph shows that lesion demineralization has spread to less than the outer third of the dentine (i.e., a shallow lesion), then tissue removal can stop when sound dentine is reached, scratchy to a sharp dental explorer. This maximizes both the support and integrity of the complete tooth-restoration complex.
Priorities change, however, if the lesion is deep and approaches the pulp – i.e., when the inner third to quarter of the dentine is affected. In this case, the primary concern is to maintain the vitality and sensibility of the pulp. Minimally invasive preparation guidelines recommend ending tissue removal at the caries-affected dentine overlying the vital pulp. Leaving this demineralized tissue intact is a natural measure to protect against pulp exposure. Ideally, the enamel-dentine junction (EDJ) should be prepared to sound enamel and dentine, where clinically possible (see below).
How can you promote peripheral adhesion and seal of the tooth-restoration interface?
In addition to preserving tooth structure and maintaining pulp viability, the third main goal of selective caries removal is to create a peripherally sealed tooth-restoration interface at the enamel-dentine junction (EDJ).
First and foremost, try to preserve sound enamel and dentine whenever possible at the EDJ.4 During this peripheral caries removal, however, it’s important to balance the attempt to reach sound enamel/dentine with the need to avoid further compromising tooth structure, as well as managing practical operative conditions (e.g., moisture control, particularly if the cavity margin extends subgingivally). Excavate lesions peripherally (at the EDJ) to sound enamel/dentine in order to promote maximum peripheral adhesion and seal of the tooth-restoration complex.
If sound enamel is available at the cavity margins, then the lesion can be managed more conservatively by retaining caries-affected dentine over the pulp. Histologically, sound enamel is the ideal substrate to help support restorative margins and provide an optimal peripheral seal and bond. On the other hand, enamel that is demineralized, unsupported and weakened must be removed. Use either rotary instrumentation or hand chisels and leave a lightly beveled finish; this optimizes the prismatic structure and creates a greater surface area for adhesion.
Finally, for the bond itself, use an adhesive you can trust to reliably bond and seal the tooth-restoration interface. I compare this process to a cork sealing a bottle. We are trying to plug a hole with a restoration that seals around its periphery. In addition to appreciating the tissue histology, it’s important to know how your adhesive interacts with the tissues; does it infiltrate into caries-affected dentine to allow the best possible seal? Sealed-in carious tissue does not continue to “progress actively” – in fact, quite the opposite. Without access to nutrients, numerous studies have shown that the bacteria die off and become quiescent over time. This allows the dentine-pulp complex to naturally biologically repair itself – the ultimate goal of MID. Laboratory evidence shows that 3M™ Scotchbond™ Universal Plus Adhesive can seal and bond to caries-affected dentine.5 This is due in part to its high bond strength – it bonds to caries-affected dentine as well as to sound, in part due to its formation of a well-defined, void-free collagen hybrid layer. Together with minimally invasive tooth preservation and the protection of pulp viability, this can help increase the clinical longevity of the overall tooth-restoration complex.
Take a closer look at two, step-by-step clinical sequences to see how Scotchbond Universal Plus Adhesive can be used in conjunction with a minimally invasive selective caries removal approach, thanks to its ability to bond and seal caries-affected dentine.
On presentation: A vital maxillary first adult molar tooth presents with two areas of cavitation (central and distal). The radiograph of the tooth shows extensive demineralized lesion spread coronally.


Step 1: Enamel access:
Using very gentle brush strokes, and allowing the air rotor to do the work, a fine, rounded diamond bur is used to open access from the center of each cavitated lesion outwards (first the central cavity followed by the smaller distal cavity), down to the enamel-dentine junction.

Step 2: Carious dentine preparation
A small spoon excavator is used to excavate the soft, wet, flaky caries-infected dentine at the enamel-dentine junction, followed by the pulpal and buccal aspects. Gentle, paring strokes are used to ensure controlled tissue removal and reduce the risk of unnecessarily exposing the pulp chamber.
On the buccal aspect, weak, demineralized enamel is removed, resulting in the loss of the buccal wall (see above). A rose-head bur in a slow-speed motor handpiece is then used to refine the cavity, removing the caries-affected dentine peripherally at the EDJ.

In the distal cavity, a small spoon excavator is used to remove the caries-infected dentine. It’s important to not use too much pressure with such small instruments, to avoid digging too deep. Then a rotary bur is used just to gently finish off excavation and remove any remaining caries-infected dentine. A sharp dental explorer is run over the tissue to ensure only caries-affected tissue remains – indicated by a slightly scratchy sound against leathery/firm dentine. This caries-affected dentine can be retained as modern adhesives can form a seal with it.

Step 3: Cavity modification and finishing
A fine diamond bur is used to finish the enamel margins on both cavities. This removes any final unsupported enamel present. Be careful to ensure there are no sharp internal line angles and that any final loose pieces of carious dentine are removed.
Step 4: Adhesive procedure
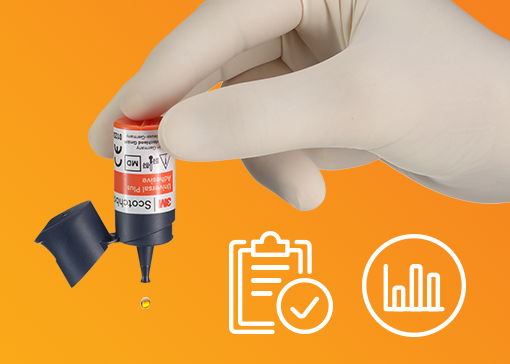
3M™ Scotchbond™ Universal Plus Adhesive is selected for its ability to work in different modalities and because its water and ethanol-based solvent helps to rehydrate dried tissue during application.


The enamel margins are selectively etched for 15 seconds. A total-etch technique was used on the smaller, distal cavity on both the enamel and dentine. Both cavities were then thoroughly rinsed and air-dried for 10 seconds.

A microbrush was used to agitate adhesive into both cavities for 20 seconds to ensure penetration, air thinned for 5 seconds until glossy with no further surface rippling detected and light cured for 10 seconds.


Step 5: Cavity restoration
To disguise the remaining dark, stained dentine over the pulp, 3M™ Filtek™ Universal Restorative Pink Opaquer was applied and light cured. This was followed by 3M™ Filtek™ Universal Restorative (Shade A3) in incremental build-ups before final finishing and polishing.

The post-operative radiograph shows a radiolucent zone beneath the restoration, which represents the retained caries-affected dentine. Watch the video to see the full procedure in detail with commentary.
Initial presentation: A permanent mandibular molar with a large cavitated occlusal carious lesion features demineralized peripheral enamel around the cavity margin, as well as in all the fissure patterns on the tooth. The radiograph shows a deep demineralized dentine lesion.


Step 1: Enamel access
A fine diamond bur in an air-rotor handpiece is used to prepare the demineralized enamel around the cavity margin. In keeping with a minimally invasive philosophy, only the most affected fissure pattern (mesial) is selected for operative intervention and is excavated with a small round diamond bur. The fissure lesion extension is deemed superficial, indicating the remaining demineralized fissures could be left to be sealed later.

Step 2: Carious dentine preparation
A small spoon excavator, followed by a rose-head bur in a slow-speed motor handpiece, are used to gently excavate caries-infected dentine from the peripheral enamel-dentine junction (EDJ). A sharp dental explorer is dragged across the enamel-dentine junction to ensure no caries-affected tissue remains – indicated by a clear scratchy sound emitted from sound dentine.

The caries-infected dentine over the pulp is removed using the spoon excavator as a rake – dragging, not digging, over the dentine surface to avoid unnecessary pulp exposure.

Step 3: Cavity modification and finishing
The enamel margins are smoothed and lightly beveled with a fine diamond bur. Any flaky pieces of carious dentine are also removed and internal cavity line angles rounded where required. Some undermined enamel is left in place: modern adhesive restorations in combination with 3M™ Scotchbond Universal Plus Adhesive can help support this tissue, so additional removal is not needed.
Step 4: Adhesive procedure
3M™ Scotchbond™ Universal Plus Adhesive is selected for its ability to be used in three different etch modes and to bond and seal caries-affected dentine.

In this case, the enamel margin, including the extended demineralized fissure patterns, is selectively etched for 15 seconds, before being washed and thoroughly air-dried for 10 seconds.

Using a microbrush, adhesive is placed onto the enamel surface, fissures and into the cavity and agitated for 20 seconds to ensure coverage. The adhesive is gently air-thinned until glossy with a motionless surface and light cured for 10 seconds. Scotchbond Universal Plus Adhesive bonds and seals caries-affected dentine, making it ideal for a minimally invasive case with both demineralized fissures and undermined enamel.

Step 5: Cavity restoration:
3M™ Filtek™ One Bulk Fill Restorative (shade A3) is placed in one increment from the base of the cavity to the occlusal surface, light cured, finished and polished.

In the post-operative radiograph, the retained carious dentine appears as a radiolucent zone beneath the restoration – making it important to write careful notes and inform the patient to avoid future misdiagnoses and overtreatment.
What I expect from an impression material is easily summed up: it should be universal (i.e. suited for the ‘open’ tray and ‘closed’ tray impression technique alike), and it should enable me to capture the complete three-dimensional position of the restorative implant platform, including the teeth and soft tissues. With those criteria met, you are only left to select the appropriate working time.
The latest innovations in bio-interactive restorative dental materials support the execution of minimally invasive restorative interventions efficiently and effectively. Not only are modern universal adhesives becoming simpler to use, with fewer clinical steps, but material innovations are also creating further opportunities for successful outcomes using minimally invasive principles. In particular, Scotchbond Universal Plus Adhesive exhibits good bond strength to caries-affected dentine and has added radiopacity to enable more accurate radiographic diagnoses. Together, these modern materials and techniques can help you create reliable restorations with consistent operative techniques and successful outcomes. By taking a closer look and appreciating the qualities of a deep carious lesion – and a broader holistic consideration of your patient as a whole – you can empower your oral healthcare team to deliver more comprehensive prevention-based care for each patient and promote better dental and oral health for the public using the minimum intervention oral care delivery framework.
1. Banerjee A. “MI”opia or 20/20 vision? Brit Dent J, 2013; 214: 101-105.
2. Banerjee A. ‘Minimum intervention’ – MI inspiring future oral healthcare? Brit Dent J, 2017; 223: 133-135.
3. Banerjee A. Minimum intervention oral healthcare – is there consensus? Brit Dent J, 2020; 229 (7): 393-395.
4. Banerjee A. Minimally invasive operative caries management: rationale and techniques. Brit Dent J, 2013: 214: 107-111.
5. C. Thalacker, H. Loll, B. Anich, K. Dede, J. Madden, A. S. Abuelyaman, B. Craig. Interaction of an Experimental Universal Adhesive with Caries-Affected Dentin, J Dent Res 99 (Spec Iss A), No. 0191, 2020. https://iadr.abstractarchives.com/abstract/20iags-3322611/interaction-of-an-experimental-universal-adhesive-with-caries-affected-dentin
Achieving the correct shape is vital to a natural-looking anterior composite restoration. Learn how the 3M™ Filtek™ Matrix, paired with…
Direct composite restorative procedures can be challenging, particularly when it comes to esthetic cases. Discover how new techniques and tools…
When choosing a new universal adhesive for your office, you have a lot to consider – including clinical history. Take…