
Zirconia puzzle: what makes zirconia unique and how to choose the right zirconia
Zirconia may be part of your everyday vocabulary, but how much do you know about this ceramic material? Learn more…


When should you layer composites with multiple shades or opacities? Discover the esthetic and practical benefits of this classic technique – taken to a new level.
Layering as a composite placement technique is traditionally utilized to reduce shrinkage stress, but this approach can provide additional benefits – particularly in terms of esthetics. And no region requires an expert esthetic touch like the anterior. Multi-shade layering may be more time-consuming than single-shade techniques, but multiple layers also maximize the esthetic potential of composites. Let’s take a closer look at how multiple shades and opacities can bring out the best in your anterior restorations.
“Layering” can mean more than working in increments: it can mean working with materials with different opacities. Many clinicians focus on chroma and aren’t necessarily thinking about the effect of opacity on overall esthetics – however, it’s just as important to the equation.
Teeth are complex esthetically. They themselves are made up of two different layers with different optical properties that affect one another. Dentin, for example, is more opaque than enamel, and is responsible for most of a tooth’s color. However, we see this color through enamel, which distorts that color with its own shade, opacity and thickness – like looking outdoors through frosted glass. With all of this in mind, it only stands to reason that you may need to layer opacities to achieve a natural looking result.
When approaching the esthetics of any given tooth, anterior or posterior, I look at the tooth I’m going to restore as well as the adjacent teeth. Your restoration should not only match the tooth in question but also fit into the smile as a whole.
However, before you can even begin to consider layers, you should first make sure that your materials enable you to match as many cases as possible. For example, 3M™ Filtek™ Supreme Ultra Universal Restorative has more opacities than any other brand: it provides options for dentin, enamel, body and translucent effects.
With your materials in hand, here are some possible situations – and solutions – you may encounter:
The size of the restoration also matters. If it is small, enamel alone may suffice. However, if it’s a large class IV restoration you may need to use both body/dentin and enamel shades. Just like natural dentin, opaque body shades act as a “backing” to the rest of the restoration. Lastly, place a thin layer of enamel on the facial – and a little thicker toward the incisal edge – to achieve the gradient effect.

Layering schematics

Layering 3M™ Filtek™ Supreme A2D as dentin replacement.

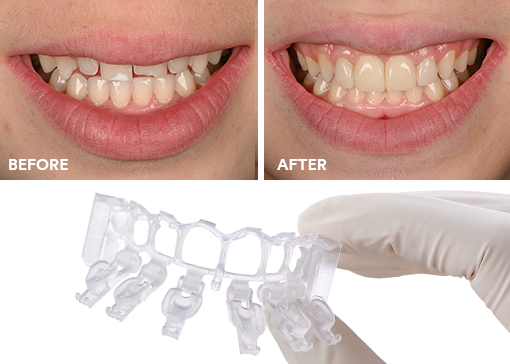
Before and after layered composite restoration.
Layering can be a very useful technique but isn’t required – or ideal – for every case. Going from one to two layers is an esthetic step up, as it can help create the unique translucencies found in natural dentition – but insurance companies pay for function, not esthetics. For patients without insurance, a two-layer restoration may be too expensive. I always try to think about that balance and put myself in my patients’ shoes. It’s also important to remember that more layers take more time, which can also have an impact on your schedule and your bottom line.
With all of this in mind, there are two things I take into consideration when deciding whether or not to layer:
If these two factors align, it’s a clear sign that layering is the optimal choice.

Composite selection can be a complex and confusing process, especially when you’re trying to achieve consistent, esthetic results. For a universal composite, I look for something with a variety of shades that cover most cases, plus high strength and good handling. A material can offer excellent properties, but if it doesn’t handle well for the way you work, that can negate any benefit it could’ve brought to the table.
However, composite selection is often subjective – different dentists like what they like. Find a material that handles the way you like it. Once you’re confident with a material, it will work well in your hands, and you can achieve great things with it. And there are techniques you can use to make less-esthetic materials “disappear” with color, beveling or translucency.
Manufacturers tend to have materials geared toward single- or double-layer users. To this end, they usually have two different lines of materials – one dedicated to single-layer monochromatic procedures and one to layering. This can make it difficult for clinicians to make the transition from single to multi-layers. Getting to know a new material takes time, and if you’re buying two different categories of material, you could be complicating your inventory and setting yourself up for a long learning curve.
However, some materials make the transition easier. If you’re using 3M™ Filtek™ Supreme Ultra Universal Restorative, for example, you could expand your techniques by simply buying more shades of the same material to explore and begin practicing.
We can’t talk about layering without discussing flowable composite. Looking back at the recalls of my patients over the years, every so often I’d encounter a little void between my increments. That tells me there wasn’t very good adaptation between layers. To combat this issue, I put a little flowable in first so that the more viscous material adapts better. Since I implemented that practice, I don’t see those voids between recalls anymore.
When my students have a hard time adapting their composites, I think a flowable – and/or a warmed composite – can help. In addition, it’s important to make sure your materials work together. Flowables and universals are much more compatible than they used to be, and it’s worth paying attention to the details. What I like to teach is to clean up the flowable a bit as it’s extruded. While flowable composites’ physical properties aren’t bad, you don’t want them to be placed where they’ll be subjected to stress or wear. Universal composites have superior properties – so that’s the material you want to be on the occlusal contact.
As beneficial as flowable composite can be to your adaptation, you can’t neglect its impact on color and esthetics. Most importantly, the flowable shade should match your universal body shade composite. If they don’t match and you can’t clean up all the flowable, it won’t match the final restoration. However, you can’t assume every flowable matches the shade of more viscous materials. Thankfully, certain manufacturers take care of these issues for you. 3M, for example, features a match between their 3M™ Filtek™ Supreme Flowable Restorative and universal composites (3M™ Filtek™ Supreme Ultra Universal Restorative and 3M™ Filtek™ Universal Restorative).
In addition to a color match, you want a material that doesn’t produce bubbles during extrusion. When we place flowables, there’s often air entrapment in either the syringe or the tip that may result in voids. Just as with improving shades, some manufacturers have developed syringes designed to eliminate bubbles. Making use of these innovative materials can help you ensure the most esthetic result possible.

Your flowable composite shade should match the body shade of your universal composite.
There are many different ways to place composites, each with their own benefits and challenges. While layering different shades and opacities of composite takes more time than using a single shade, this technique can be useful in a number of situations – and can help you achieve long-lasting, natural-looking esthetic results. It may take some time to master the technique, but it can help you create a masterpiece.

Zirconia may be part of your everyday vocabulary, but how much do you know about this ceramic material? Learn more…
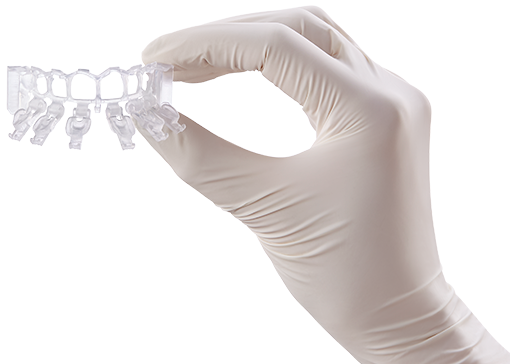
Achieving the correct shape is vital to a natural-looking anterior composite restoration. Learn how the 3M™ Filtek™ Matrix, paired with…
Direct composite restorative procedures can be challenging, particularly when it comes to esthetic cases. Discover how new techniques and tools…