
Zirconia puzzle: what makes zirconia unique and how to choose the right zirconia
Zirconia may be part of your everyday vocabulary, but how much do you know about this ceramic material? Learn more…


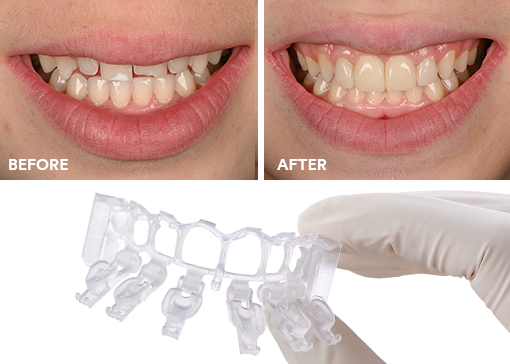
In orthodontics, a good finish is influenced right from the start of treatment. The accuracy of bracket placement, compared to the treatment plan, can impact the trajectory of the case and the work needed in the final stages to achieve the objectives. Inaccurate bracket placement may result in undesired tooth movements and the need to reposition brackets and/or bend archwires.
Accuracy, though, is not the only factor, as a bonding protocol that provides accuracy but is lengthy and complex can deliver its own challenges to treatment progress. The ideal is to achieve accurate placement in as little chairtime as necessary in a predictable and repeatable protocol. Accuracy, efficiency and consistency, then, are key elements in orthodontic treatment that must work together to help deliver expected results.
Direct bonding is the most common method for bonding orthodontic appliances, but it can present a number of challenges to a practice. Despite advanced analysis of bracket placement, the accuracy achieved is the result of manual placement on each tooth. Direct bonding requires moisture isolation of the teeth long enough to prepare the enamel and place each bracket tooth by tooth individually. The longer the required isolation, the greater the potential for moisture or other variables to compromise the bond. The extended time required of the orthodontist to attend to the placement and positioning of the brackets during an appointment and the multiple factors that can affect the final placement of a bracket are common challenges to the efficiency of direct bonding and the consistency in the bond success rate.
Many doctors have tried indirect bonding as a solution to the challenge of bonding. The fact that brackets are placed on models outside of the oral environment allows access and visibility that may contribute to more accurate placement¹. It has been reported that bonding appointments are much shorter when practicing indirect bonding and that, depending on local regulations, the chairside procedure may be delegated to staff². Shorter bonding appointments may result in greater interaction with patients and/or parents. The bonding appointment itself may be less taxing on the orthodontist as placement decisions no longer need to be accomplished while maintaining a dry field and working in an uncomfortable position². Seating the brackets en masse allows better moisture control that may lead to lower bond failure rates. However, traditional indirect bonding processes require significant investments in laboratory equipment and training³.
Addressing some of the common challenges of both direct and indirect bonding, the advent of intraoral scanning and 3D printing enable an easy alternative to traditional techniques. Rather than taking an impression, patient information can be collected via an intraoral scanner. The scan thus generated can be immediately shared with an external manufacturer, rather than having to wait for delivery of physical impressions. Intraoral scanning may also be more comfortable for patients and reduce the amount of consumable inventory carried in the office. 3D printing enables direct manufacture of models or trays from the intraoral scan.
3M™ Digital Bonding uses intraoral scanning and 3D printing to provide doctors the advantages of indirect bonding without the additional lab equipment. Using the 3M™ Oral Care Portal, the same intuitive interface used for 3M™ Clarity™ Aligners, doctors can order digital bonding trays. 3M’s treatment designers will provide suggested bracket positions which doctors can modify in the Portal. In fact, since the ordering takes place in the Oral Care Portal, doctors can mix aligner and bracket treatment in the same case. From the 3M™ Tx Design, a bonding tray is created for doctors to load brackets to the specified positions and orientations. This tray delivers the brackets to teeth with an accuracy of 0.21 mm in the occlusal-gingival direction and 0.02 mm in the mesial-distal direction. In the case of the 3M Digital Bonding Tray, those appliances are pre-coated with 3M™ APC™ Flash-Free Adhesive. The APC Flash-Free Adhesive System offers less than 2% bond failure rate and is the only adhesive in digital bonding procedures that does not require removing flash. The bonding tray is created by 3M, so there is no need to invest in 3D printers or provide laboratory space.
The process begins with an intraoral scan. 3M’s treatment planning team will digitally place brackets on the teeth according to 3M™ MBT™ Versatile+ Appliance System rulesReference 5 . An example is shown below.

Figure 1: Brackets are placed on teeth using MBT System rules.
Using the Portal, the doctor may then make changes to the bracket positions and orientations. Alternatively, the doctor may make changes to the desired final tooth positions and orientations with the software calculating the bracket positioning. As shown below, the controls are similar to those used for making changes to Clarity Aligner treatment designs.

Figure 2: Treatment design using 3M™ Tx Design in the Oral Care Portal.
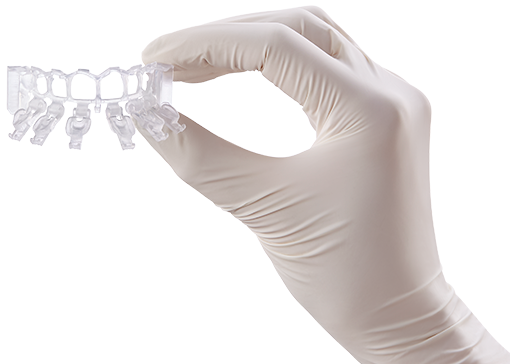
Once the doctor approves the Tx Design, 3M will manufacture the bonding trays. The trays are a dual-layer design consisting of a pliable silicone inner layer and a rigid polyester outer layer. A soft gel inlay to conform to the patient’s anatomy and a hard outer shell to add rigidity and to support placement of the tray.

Figure 3: 3M’s dual tray technology.
The trays are formed over a 3D printed model of an arch with bracket analogs on the surface. The forming creates pockets in the tray that are designed to allow easy bracket insertion while holding the bracket securely and delivering them to the teeth accurately. A cross-section of the tray below demonstrates the structures that securely hold the bracket under the occlusal tie wings and in the archwire slot while leaving the gingival side open for easy insertion.
The bracket is inserted by first engaging the occlusal tie wings with the tray then rocking the bracket into the pocket so that the slot is engaged.

Figure 4: The 3M Tray was designed for accurate bracket placement.
Once brackets are loaded, the tray may be stored in a light-tight box for up to 4 days prior to bonding. This allows this task to be completed prior to the patient arriving in the office and to be delegated to a staff member.

Figure 5: Bracket insertion and slot engagement.
In order to discuss the accuracy of bracket placement, a scientific test method had to be developed that compares the planned bracket location with the actual bracket placement. This method needs to also give the placement error in a format that is meaningful. This test method defines the origin point as the bottom center of the wire slot, with the three axes as mesial/distal, gingival/occlusal, and labial/ lingual. As a result, the accuracy numbers in this system represent all error in terms of the slot position – not the bracket base. Since the interaction between the archwire and slot is what drives treatment, accuracy of the slot is the most critical. See Figures 6-9 to view the movements that the test method included.
Our accuracy test method starts with two digital files, the scan of the bonded brackets, and the digital setup in the malocclusion configuration. The bonded scan is then aligned to the digital setup via a 3D best fit algorithm; this step converts the bonded scan from the arbitrary coordinate system provided by the scanner, to the coordinate system our treatment software uses. This step excludes the brackets from the alignment algorithm in order to prevent brackets from biasing the fit. The second step is to load a digital version of the bracket—in the slot coordinate system—at the planned position. Then using a 3D best fit algorithm, the digital bracket is moved into the actual position in the scan. The amount that the digital bracket is moved is the difference between the bonded location and the digitally planned location. The results indicated a high accuracy when comparing the digital plan with the actual position: on average, less than half a degree of rotation, less than a quarter of a millimeter in the occlusal-gingival dimension, and less than a tenth of a millimeter in the mesial-distal dimension. Figures 10-14.

Figure 15: The tray may be stored in a light-tight box for up to 4 days prior to bonding.
At the bonding appointment, the usual procedures for isolation, cleaning, etching and priming are performed. The bonding tray is then seated on the arch and the brackets illuminated with a 3M™ Ortholux™ Luminous Curing Light according to the following table:

Table 1:
The step of light-curing the adhesive is done twice, once while the tray is in place to secure the brackets and then again after the tray is removed to ensure a complete cure. Curing after tray removal ensures that enough light reaches the adhesive unhindered by the tray.
Using APC Flash-Free Adhesive is key to 3M Digital Bonding. Using a traditional paste adhesive will result in excess flash being deposited around the bonding base peripheryReference 4 . This is particularly troublesome because once the tray is removed any flash will be hardened and may require a handpiece and bur for removal. Grinding away excess adhesive flash is not only time-consuming, it may be uncomfortable for the patient. When using APC Flash-Free Adhesive, excess flash is not a problem. The relatively low viscosity resin forms a protective meniscus around the bonding base. This makes APC Flash-Free Adhesive Coated Appliances the only choice for 3M Digital Bonding.
The tools used in orthodontic treatment have progressively changed over time, but the fundamentals of accuracy, efficiency and consistency remain as important as ever. 3M Digital Bonding delivers the accuracy needed to align to the treatment plan while offering the efficiency needed to reduce chairtime and bonding variables. This achieves consistency in the appointment and the course of treatment to help achieve the goals set for each patient. For more information about 3M Digital Bonding please visit 3M.com/digitalbonding.
References
THIS ARTICLE WAS OIRGINALLY WRITTEN BY DR. DAVID K. CINADER AND JOSEPH R. DUFOUR FOR 3M.

Zirconia may be part of your everyday vocabulary, but how much do you know about this ceramic material? Learn more…
Achieving the correct shape is vital to a natural-looking anterior composite restoration. Learn how the 3M™ Filtek™ Matrix, paired with…
Direct composite restorative procedures can be challenging, particularly when it comes to esthetic cases. Discover how new techniques and tools…