Some patients may wonder how one dentist could recommend one procedure, while another might recommend a different one or maybe none at all. How could there be such differences? As a dentist, you understand that you and your peers have varying degrees of experience and treatment philosophies. And each office has different imaging devices and software that provide greater or lesser detail in radiographs. Here are a few best practices for your practice to improve diagnostic accuracy using technology and provide better patient outcomes.
The Importance of Diagnostic Accuracy Using Radiographs
Since the advent of modern X-rays, radiographs have been used to assist dentists in helping identify oral health problems with teeth, bones, and soft tissue in the mouth and jaw. Being able to read radiographs well is crucial to making an accurate diagnosis for effective treatment. Correctly identifying underlying problems at an earlier stage keeps treatment costs low. Reliable diagnoses also help reduce unnecessary interventions and related costs for patients.
Best Practices for Improving Diagnostic Accuracy
Beyond simply gaining more experience and years under your belt in reading radiographs, here are a few best practices to help you immediately improve your diagnostic accuracy.
1. Getting the Exposure Right
Getting the exposure right as your staff captures X-rays will ensure that images aren’t too over or underexposed. When time settings are too long, too much energy is allowed in, making the image dark and burned out. If time settings are too short, then too little energy is let in, making the image grainy and lacking details. Each manufacturer will have recommended settings, which is an excellent place to start. Generally, the smaller the patient, the shorter the timeframe will be to expose the image correctly. The larger patients will need an adjustment for a longer timeframe for a properly exposed image.
Even though all imaging software can help make minor adjustments post-capture, it’s best to get as close to the optimum exposure in real-time as possible. This is because minor adjustments can’t salvage areas so completely light or dark that there is essentially no detail in those areas to be recovered. Make sure you train your staff to get the correct exposure as they capture X-rays and make minor adjustments within your imaging software as needed to view the image at its optimum exposure.
2. Increasing or Decreasing Contrast
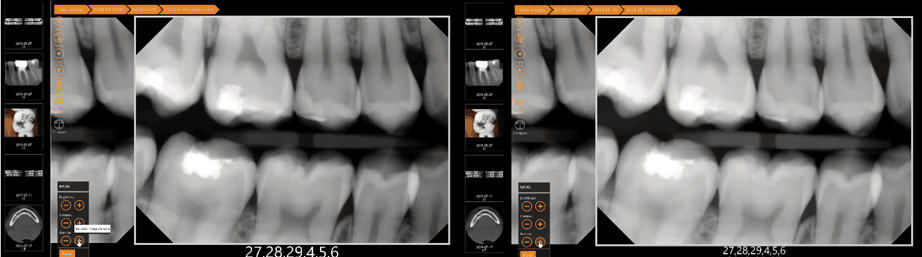
Another best practice to help increase the diagnostic value of an X-ray is adjusting the contrast. Interestingly, an X-ray image can be exposed correctly yet still have too high or too low contrast.
Think of your radiograph as being comprised of dots in varying shades of black, gray, and white on a spectrum. For images that are too high contrast, there are too many dots at the far ends of the spectrum, clustering too close to the black and white areas. X-rays that have too high contrast can prevent you from seeing detail in the gray gradients of your X-ray. Conversely, if an X-ray has too low contrast, the dots are clustered closer to the middle gray area of the spectrum, not offering enough detail in the lightest and darkest areas of the X-ray. See below for the default original image (left) and the adjusted image (right).
Your staff can use imaging software like cloud-enabled Apteryx XVWeb to adjust the contrast until there’s a good balance across the spectrum of colors so you can visualize the darkest areas, the lightest areas, and all areas in between.
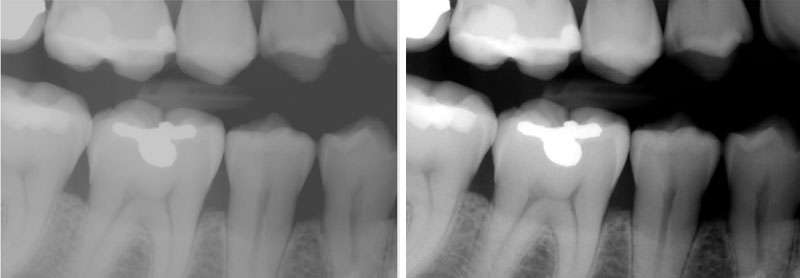
3. Understanding and Correcting Gamma
We’ve now learned that you can adjust contrast in an X-ray for greater or lesser detail at the ends of the black and white spectrum, but what should you do if you want to adjust just the grays? Here’s where gamma correction can help.
By adjusting the gamma, you can alter all the varying grays to increase detail in the middle range of shades in a radiograph.
Below, you can see how adjusting the gamma creates more detail in the gray areas of the radiograph.
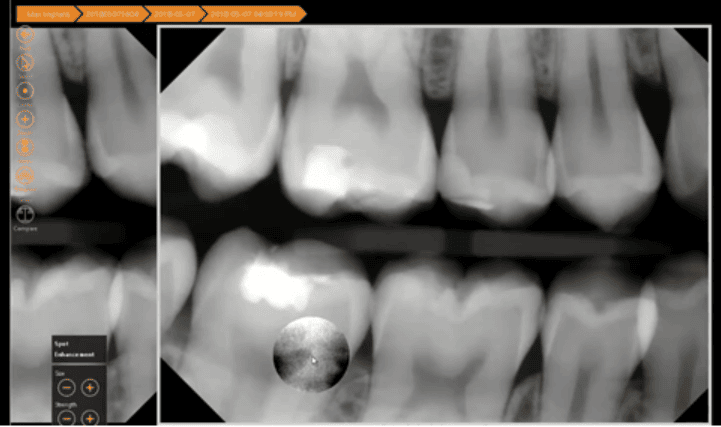
4. Taking a Closer Look with Spot Enhancements
Next, what if you’re happy with your exposure, but you want to take a closer look at a specific part of the radiograph? In Apteryx XVWeb, a spot enhancement tool allows you to visualize a particular area on a radiograph better. The spot enhancement tool will allow you to magnify any suspicious areas that require a closer inspection and view them with increased contrast. In this radiograph, the spot enhancement helps you take an enhanced look at one specific area.
5. Collaborating with Colleagues
Another best practice you can implement to improve your diagnostic accuracy quickly is collaborating with colleagues or external providers. With Apteryx XVWeb, you can easily utilize the HIPAA-compliant sharing portal feature to help you confirm your diagnoses and learn how to accurately read X-rays faster. Having a quick second opinion can help you plan treatment for your patients confidently and deliver better clinical outcomes. Even better, if you have both Denticon practice management solution and XVWeb, you can easily refer cases to providers within your group or DSO or to an external provider if you decide to refer the treatment out to another provider.
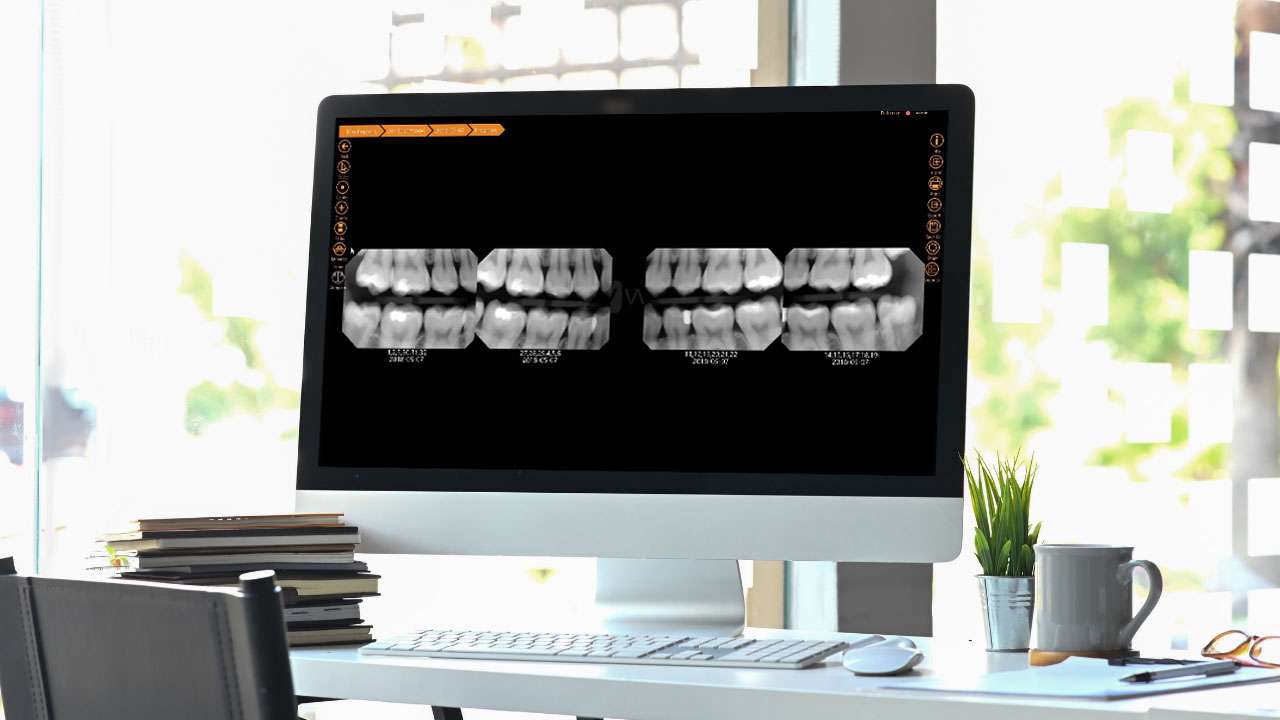
Apteryx Imaging’s Cloud-Enabled Solution: XVWeb
Find out how Apteryx Imaging XVWeb can reimagine how you manage X-rays at your practice. If you’re interested in upgrading your existing imaging solution, we offer an advanced, cloud-enabled imaging solution that helps you improve your imaging workflow and your diagnostic accuracy. From custom clinical filters, advanced imaging enhancement tools and filters, to HIPAA compliant secure sharing of images, XVWeb helps you diagnose and treat better. Schedule a demo to learn more about how cloud-enabled XVWeb can help your practice.