Fabricating a crown under an existing removable partial denture requires special attention by the dentist to ensure an optimal outcome. This is one of the most challenging impressions in dentistry when seeking a proper fitting prosthesis. This edition of the DDS Dispatch is intended to provide dentists with practical guidelines to achieve success.
While each of these options can be successful, we have listed them in order of best practice for the best outcome.
Traditional Impression Approaches
Option 1: Pickup impression with the partial seated firmly in place.
When taking a traditional impression, the recommended option to fabricate a crown to fit an existing partial is to take a pickup impression with the partial seated firmly in place. The clinic should then send the entire pickup to the lab leaving the partial inside the impression. This allows the lab to create the model with the partial seated exactly as it fits in the mouth. This will result in an accurate fit of both the crown and the partial.
Option 2: Make a partial index using blue mousse
Another option is to make a partial index using blue mousse. The use of blue mousse is important because of its sturdiness and less chance of creating distortion than a lighter body impression material.
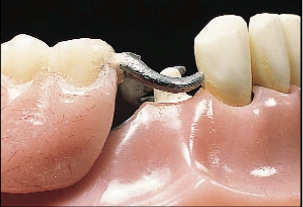
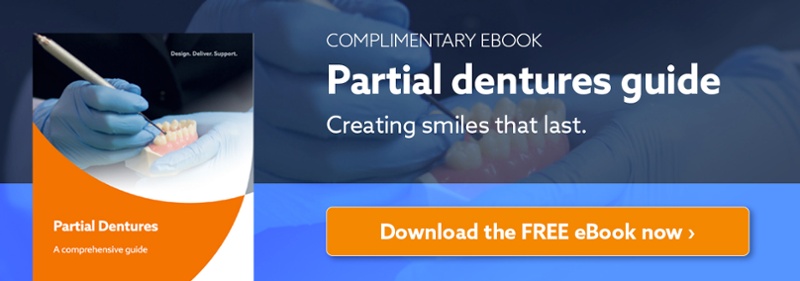
Fig.1 shows partial on model to represent partial seated in mouth. Must be seated all the way and stay in place.
The partial needs to be seated firmly for this approach to work properly. The blue mousse material is squirted around the crown prep, the clasps, the rest seats, and the contact areas. The dentist must wait until the blue mousse material sets up completely before carefully removing the partial.
If some of the material tears this is not concerning as long as the clasps and rest seats are clearly visible. It is also okay to cut away some of the material to remove the partial as long as the rest seats and clasps are maintained.
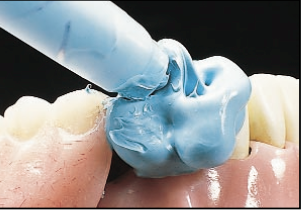
Fig.2 Blu Mousse being applied around prep, clasps, rest seats and needed contact areas.
The index will be used by the lab to create a resin copy of the clasps and rest seats to be glued onto the model. The dentist should then take an impression of the prep without the partial and include it with the index.
 Fig. 3 shows index before being removed from partial
Fig. 4 shows trimmed index before removing from partial.
.png?width=364&name=dentures_figure_5%20(1).png)
Fig. 5 shows index on prep with resin replica fabricated.
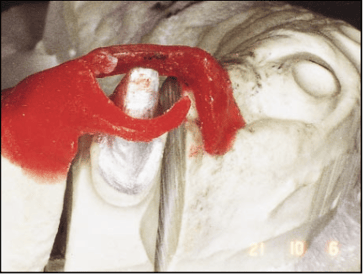
Fig. 6 shows final index on model and ready to start fabricating crown.
Option 3: Remove the partial from the impression before sending it to the lab.
Realistically though, the patient is unlikely to want to go without the partial denture. In this case, the dentist should carefully remove the partial from the impression before sending it to the lab. Critically important is the need to ensure the partial is firmly in place for this first impression. The dentist will need to take a second impression of the prep without the partial to confirm the appropriate margins.
The lab will use the second impression to make a resin replica carefully capturing the clasps and rests and joining it to the working model made from the impression without the partial.
Please note:
that Option 3 is not one that DDS Lab endorses because it has a higher level of failure. Option 2 will be more ideal if partial cannot be sent in the impression.
All these options can be successful if the proper steps are followed. Note that using triple trays for any case involving a removable partial denture can increase the chances of distortion. Most important is to make sure partial is properly placed and that it is seated all the way down on all options discussed. A bite registration should also be done to help confirm the correct occlusion.
Digital Impression Approaches
If the dental office has transitioned to digital impressions, then the best way to proceed is to fabricate a full-contour zirconia crown.
- The dentist needs to do a pre-op scan first. The pre-op scan must be taken without the partial in place, so all contours and rest seats are visible. The pre-op will be used by the lab to confirm the shape and size of the crown.
- After prepping the tooth, a second scan is taken to capture the margins, the contact areas, and enough of the arch to confirm occlusion. The lab uses the scan of the original tooth to be crowned and imposes it onto the scan of the prep.
- The lab then creates the margin to make an exact replica of the tooth allowing the partial to seat properly. Note that a scan with the partial in place is not needed. Notes should be included indicating that the crown will fit the existing partial denture.

When fabricating a PFM, layered zirconia, or a full cast crown using digital scans, models will need to be printed by the lab. The lab will need scans of the prepped tooth, the opposing, and the correct bite. It is important to review the scans to make sure margins, contacts, the opposing, and the bite are captured correctly.
The lab will also need an index made of how partial fits around the tooth as described above under partial index. See the figures above for the process. The resin pattern made from the index is attached to the printed model and the crown is then fabricated.
It is important to add notes on the digital Rx that the case is to adapt to the existing partial and that a physical index is being shipped. This informs the lab to hold the scans until the index is received and is combined with instructions and a copy of digital Rx to prevent any mistakes. It is important when shipping the index to print a copy of the digital Rx and put the index in a clear bag, write the patient's name on the bag, and staple it to the Rx. This makes it easy for the shipping department to send it to the digital department.
Please note:
The crown should be tried in for dry try in (DO NOT CEMENT FIRST) to make sure crown and margins seat and then attempt to seat the partial. If the partial does not fit, you must call the lab to discuss with a technical team member. Cementing the crown without first verifying the fit of the partial will result in charging for a new partial. If you cement the crown and then return to adapt the partial you will be voiding the DDS Lab warranty. DDS Lab will not fabricate a complimentary partial.
If you ever experience cementing complications, call our lab directly to discuss your specific case with our expert technical team. DDS Lab’s technical team is ready to help solve any challenges regarding impressions and will work with your office to find the best solution.
Schedule a consultation with our technical team ›