
Zirconia puzzle: what makes zirconia unique and how to choose the right zirconia
Zirconia may be part of your everyday vocabulary, but how much do you know about this ceramic material? Learn more…


Post and core procedures may seem like one big challenge, but they’re really comprised of many smaller challenges. See how a few simple guidelines can control some of the variables and set you up for success.
As discussed in the article, “To post or not to post? Deciding how to restore a root-canal treated tooth,” a post-and-core build-up procedure using a glass fiber post can be a suitable treatment option for restoring root-canal treated teeth. However, in order to achieve predictable and long-lasting results, it’s important that all the different steps of the treatment protocol and luting process are performed correctly.
When preparing for a post, select the widest root canal – and take care to not overprepare or enlarge the canal. Make sure to leave at least 4 to 5 mm of gutta percha as an apical barrier and ensure the post preparation diameter is smaller than one third of the root diameter. The post should preferably be as long as the crown and, in case of periodontal breakdown, at least half the length of the root still supported by bone to distribute stress and decrease the risk of fracture.1,2

Post retention depends on a number of factors, including the type of cement, time of placement, post material and possible contaminants. Since fiber posts are adhesively luted into the root canal using dual-cure cements, the post should be highly translucent to allow adequate light transmission to light-cure the cement. Root canal sealants containing eugenol may counteract the luting procedure and should therefore be avoided during root canal treatment. Delaying the post placement for one week after the root canal filling may make it easier to remove residual filling material and improve bonding with the root canal dentine.
Since conditioning and bonding inside the root canal are difficult to control, a self-adhesive luting cement is recommended as it can simplify the luting procedure significantly and decrease the risk for error.3 Do not use a lentulo to distribute the cement, as the “stirring” action can accelerate the setting reaction and cause the material to set too quickly – and prevent correct post placement.

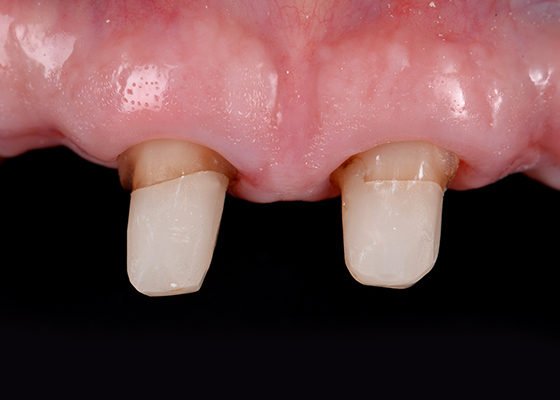
Image 1: The root canal is prepared using dedicated drills that fit the shape and size of the post. After cleaning and drying, the post is cemented using a self-adhesive resin cement (3M™ RelyX™ Unicem 2 Self-Adhesive Resin Cement) with a special endo-tip. After light-curing, a universal adhesive is applied (3M™ Scotchbond™ Universal Adhesive) and the core is built using a bulk-fill composite (3M™ Filtek™ One Bulk Fill Restorative).The final restoration was made of lithium-disilicate and could be bonded to the tooth using an adhesive resin cement (3M™ RelyX™ Ultimate Adhesive Resin Cement).

Image 2: Despite the retention provided by the large surface of the composite core, the final margin should be positioned in the dentin or enamel, including at least 2 mm of ferrule.
Sources


Zirconia may be part of your everyday vocabulary, but how much do you know about this ceramic material? Learn more…
Achieving the correct shape is vital to a natural-looking anterior composite restoration. Learn how the 3M™ Filtek™ Matrix, paired with…
Direct composite restorative procedures can be challenging, particularly when it comes to esthetic cases. Discover how new techniques and tools…