
Contouring and Polishing Anterior Composite Restorations created with the 3M™ Filtek™ Matrix
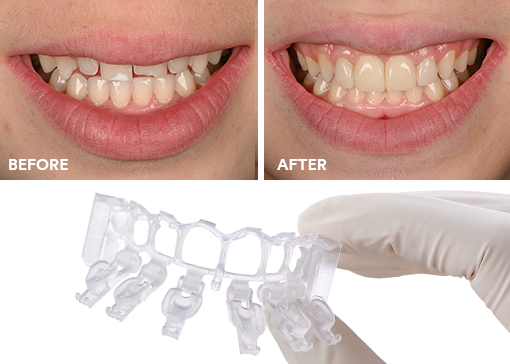
Achieving the correct shape is vital to a natural-looking anterior composite restoration. Learn how the 3M™ Filtek™ Matrix, paired with…

Finishing and polishing are more than just the final touch: these steps are key to bringing out the best in your restoration. When you hit all the right notes during the procedure, you help ensure beautiful results that last.
Patients today have great expectations for esthetic dentistry often opting for more natural, healthy-looking smiles rather than the too white “Hollywood smile.” There is also a trend away from amalgam for new fillings. Patients have also told me that they have a big smile, or that they have a habit of tipping their head back to laugh, so they want their molars to shine as brightly as their front teeth.
However, every clinician knows that esthetics don’t end with selecting the right shade: you need a color and polish that will last. And a lot can impact that delicate balance. Your choice of materials and technique can make or break the esthetics of your final restoration.
Much like perfecting a symphony, in order to maximize the esthetics of your composite, it’s important to understand how every piece of the procedure works in concert. The materials and techniques you use all contribute to the final look of the restoration – and each step can affect the next. While often overlooked, finishing and polishing are critical to long lasting esthetics. In turn, they are also affected by the materials you choose. By fine-tuning your technique, you set yourself up for esthetic success.
Composites have improved dramatically over the years and have become a wonderful esthetic alternative to ceramics. To that end, composite manufacturers strive for a balance of strength and esthetics. But not every composite is created equal.
For example, the most advanced dental composites utilize nanotechnology, which enables strength, wear resistance, lifelike color and enhanced polish and polish retention. Because of their small filler particles, nanocomposites provide the best polish, and therefore the best color stability.1 Teeth themselves are nanostructured – they’re made up of nanocrystals called hydroxyapatite – so utilizing particles of the same size invariably produces the most natural-looking result. Why do nanoparticles finish and polish so naturally? The uniform, nanostructured particles in nanocomposites mimic natural enamel, allowing them to wear at a rate similar to the rest of the tooth. This allows the clinician to create a more natural, polished appearance during finishing and polish that blends seamlessly into existing dentition. However, it’s important to note that not all “nano” fillers are truly nanostructured. Clinicians need to depend not on the name, but on what’s in the formulation and – and need to know how to handle the materials to achieve the best possible esthetics.
A beautiful restoration can finish on a sour note if the shade match isn’t just right. By controlling a few key variables, you can help simplify the process – and set yourself up to finish on the right note.
Something as simple as the lighting in the room can throw off your color selection. Make sure the lighting in your operatory either has been optimized for color matching or that you have adequate handheld lighting. Don’t forget to account for indirect lighting sources (windows, hall lights, etc.) or any color interferences (bright lipstick, colored clothing).2 It’s surprising how much the surrounding environment can affect our perception of color!
One often overlooked factor is the hydration of the tooth. Dehydrated tooth structure is whiter and brighter than the tooth’s natural color. If you match to the dehydrated tooth, the color will be off and you risk choosing a shade that’s too light. Within the first minute of isolation, the tooth will dehydrate and the color will start changing beyond acceptable limits for shade matching. Studies have shown that it may take up to 24 hours for the tooth to rehydrate. Even 15-20 minutes of the patient swishing water will not return a dehydrated tooth to its original color.3 So, especially if you are doing a highly esthetic restoration, always determine the shade before isolating.
While clinicians know that selecting the right shade is important to the esthetics of the restoration, this decision actually lays the groundwork for rest of the procedure. No matter how well you polish or how long the shade lasts, if the color is off from the start, it’s not going to look natural in the end.

Light curing is critical to the functionality of your restoration, but it affects esthetics too. An adequate cure will ensure that your composite is performing at its best including its strength, initial and final polish. It also affects the color stability and durability of your composite. That’s why it’s important to know the power and energy of your light, calibrate it for your material’s curing parameters, and ensure proper technique. Make sure to use eye protection, watch where you cure, and hold the light steady; don’t turn your head away, or the light guide may move too far away from the composite you’re curing.
Regular testing and maintenance are most important of all. Just as musical instruments require regular tuning to perform at their best, so does your curing light. Test your light routinely to make sure you’re getting the proper output. Handheld radiometers can be very helpful, but you need to know what output you’re looking for. Use a radiometer that gives detailed information about the curing light’s power and energy. Irradiance is trickier, because it depends on the diameter of the tip: a smaller tip yields a higher irradiance but means you can only cure a smaller surface area of the tooth at one time.
Alternatively, you can have a professional test your lights for you. For example, 3M representatives can visit your practice with a scientific-grade radiometer as part of the Bluelight CheckMARC testing service. They can evaluate your curing lights and give you a detailed report of accurate information. I recommend doing this 3–4 times a year, or even monthly.

Some clinicians are accustomed to wetting their instrument with a dental adhesive – but this practice could lead to problems down the line. Adhesives are primarily made up of monomers, with very little, if any, fillers. Unfilled monomers may affect the mechanical properties and appearance of your final restoration – including how color stable it is over time.
While the finale comes last, it’s often the most memorable part of a symphony – and the finish and polish are what really determine your patient’s lasting impression of your work. Improperly finished surfaces pick up stains and plaque more easily and may even cause gingival irritation. Once you’ve mastered finishing and polishing, you’ll not only improve the final look of your restorations – you’ll also enhance their health, longevity, wear resistance and color stability over time.
When composite is cured, ambient oxygen can interfere with the polymerization reaction, forming a viscous, uncured layer on the composite surface, called the oxygen inhibition layer. This layer, in addition to being sticky to the touch, is prone to staining. Therefore, it is important to eliminate this layer with glycerin gel before curing, or to remove it when finishing and polishing.
In my class, I teach the following finishing and polishing technique:
It can’t be stressed enough: during finishing and polishing procedure, that each tool is meant to perform at a specific speed. Too much rotation or pressure during finishing may remove the anatomy you’re trying to create – or can even impregnate particles from the burr into the composite. I’ve seen green or yellow particles embedded in the restoration – and you can’t blame the composite for that. Pressure is subjective, but you can very specifically control the speed. Selecting the right speed for your handpiece helps to ensure a better outcome.

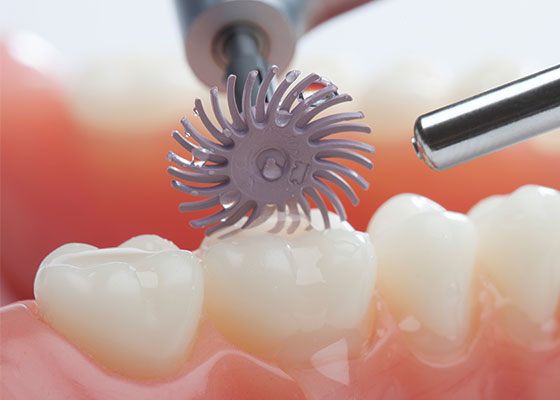
Step 1: Use carbide finishing bur to outline the desired restorative shape.

Step 2: Use 3M™ Sof-Lex™ Finishing Discs for contouring, finishing, and blending.

Step 3: Finish with 3M™ Sof-Lex™ Diamond Polishing System.
Patients always ask how long the restoration will last and maintain its appearance. My answer is “It depends.” It’s important to have this conversation, because your patients need to know how their habits will affect the results.
Diet is very important. If the patient is a heavy coffee or tea drinker, that will affect the color stability of any composite. Some composites may stain less than others, but, like natural tooth structure, all will stain over time. Our studies have found that warm, dark colored drinks stain more intensely than cool darkly colored drinks. However, if the patient rinses with water immediately after drinking a dark liquid, it will help to reduce staining.
Surface stains may be removed with a medium to fine grit Sof-Lex disc (do not use coarse as it may alter the anatomy of your restoration). If you attempt to polish it and the color does not change, then the stain has penetrated the composite. In that case, you’ll need to remove the stain completely and repair the composite.
There is no set lifetime for the appearance of a composite – it depends on too many factors. However, you can optimize the potential of your composite with careful light curing and finishing and polishing.
Like musicians, we clinicians need to know our instruments and fine-tune our technique in order to create the best performance. Our materials can’t attain optimal esthetics on their own: it’s up to us to use the right techniques to bring out the best in them.
We shouldn’t blame the composite when a color change is actually caused by inadequate finishing and polishing. Many composites are capable of excellent polish retention – but only the clinician can achieve a high initial gloss. Start by picking the right shade and taking dehydration into account; not wetting your instruments with unfilled resins; achieving a proper light cure; and finally, using the right instruments and speed for sequential finishing and polishing. By following these steps from the start, you can help ensure a crowd-pleasing finish.
Sources

Achieving the correct shape is vital to a natural-looking anterior composite restoration. Learn how the 3M™ Filtek™ Matrix, paired with…
Direct composite restorative procedures can be challenging, particularly when it comes to esthetic cases. Discover how new techniques and tools…
When choosing a new universal adhesive for your office, you have a lot to consider – including clinical history. Take…